Installation and configuration of the Pterodactyl panel
- In this guide we will tell you how to install and configure the Pterodactyl game server control panel, using Ubuntu 20.04 as an example
- Before installation, you must select and order a virtual or dedicated server
- After ordering and activating the server, you can begin installing the panel
- If you need help with installation, you can create a request to technical support and we will install Pterodactyl for free on your server
Installation of Pterodactyl panel
After ordering and activating the server, a letter with information about the order will be sent to your email, which will contain information for connecting to the server via SSH. The Pterodactyl panel is a free product, installation is supported on Linux operating systems. Below is information about supported operating systems and the required set of software.
-
List of supported OS:
- Ubuntu 20.04 / 22.04
- ОС CentOS 7 / 8 (Rocky, Alma Linux)
- Debian 11 / 12
- Debian 11 / 12 Required Software:
- PHP 8.0 or 8.1 (recommended) with the following extensions: cli, openssl, gd mysql, PDO mbstring, tokenizer bcmath, xml dom, curl, zip, fpm
- MySQL 5.7.22 and higher (MySQL 8 recommended) or MariaDB 10.2 and higher
- Redis (redis-server)
- Web server (Apache, NGINX, Caddy, etc.)
- Curl
- Tar
- Unzip
- Git
- Composer v2
To start the installation, you need to connect to the server via SSH, because most actions are performed in console mode. Please note that the installation process assumes that you have at least a minimal understanding of how Linux systems and the above software work. The following will be a list of commands and necessary actions to install the Pterodactyl game server control panel.
-
Run the command "add-apt-repository"
- apt -y install software-properties-common curl apt-transport-https ca-certificates gnupg Add additional repositories for PHP, Redis and MariaDB
- LC_ALL=C.UTF-8 add-apt-repository -y ppa:ondrej/php Add the official APT Redis repository
- curl -fsSL https://packages.redis.io/gpg | sudo gpg --dearmor -o /usr/share/keyrings/redis-archive-keyring.gpg
- echo "deb [signed-by=/usr/share/keyrings/redis-archive-keyring.gpg] https://packages.redis.io/deb $(lsb_release -cs) main" | sudo tee /etc/apt/sources.list.d/redis.list Install the MariaDB repository
- curl -sS https://downloads.mariadb.com/MariaDB/mariadb_repo_setup | sudo bash Update the list of repositories
- apt update Install dependencies
- apt -y install php8.1 php8.1-{common,cli,gd,mysql,mbstring,bcmath,xml,fpm,curl,zip} mariadb-server nginx tar unzip git redis-server
Before you continue with the installation process, you need to install Composer, a dependency manager for PHP.
-
Installing Composer
- curl -sS https://getcomposer.org/installer | sudo php -- --install-dir=/usr/local/bin --filename=composer
Then you need to create a directory in which the panel will be located and move to this directory.
- mkdir -p /var/www/pterodactyl
- cd /var/www/pterodactyl
Once you have created a new directory for the panel and moved into it, you will need to download the panel files. After downloading, you need to unpack the archive, then set the correct permissions for the storage/ and bootstrap/cache/ directories. These directories allow you to store files and also provide a fast cache to reduce loading times.
- curl -Lo panel.tar.gz https://github.com/pterodactyl/panel/releases/latest/download/panel.tar.gz
- tar -xzvf panel.tar.gz
- chmod -R 755 storage/* bootstrap/cache/
The next step is to create a database and a user, with the appropriate permissions for that database.
-
Go to the MySQL command line
- mysql -u root -p Don't forget to change 'Your Password' in the command below to your unique password
- CREATE USER 'pterodactyl'@'127.0.0.1' IDENTIFIED BY 'Your Password';
- CREATE DATABASE panel;
- GRANT ALL PRIVILEGES ON panel.* TO 'pterodactyl'@'127.0.0.1' WITH GRANT OPTION;
- exit
Copy the default environment settings file, install the core dependencies, and then generate a new application encryption key.
- cp .env.example .env
- composer install --no-dev --optimize-autoloader The command below is used only if the panel is installed on the server for the first time
- php artisan key:generate --force
The next step is to configure features such as sessions, caching, database credentials, and email sending.
- php artisan p:environment:setup
- php artisan p:environment:database
- php artisan p:environment:mail
Now you need to configure all the basic data for the panel in the database created earlier. The command below may take some time to complete, please do not terminate the process until it is completed.
- php artisan migrate --seed --force
Then you need to create a user with administrator rights so that you can log into the panel. To do this, run the below command.
- php artisan p:user:make
The last step in the installation process is to set the correct permissions for the panel files so that the web server can use them correctly.
-
If you are using NGINX or Apache (not on CentOS)
- chown -R www-data:www-data /var/www/pterodactyl/* If you are using NGINX on CentOS
- chown -R nginx:nginx /var/www/pterodactyl/* If you are using Apache on CentOS
- chown -R apache:apache /var/www/pterodactyl/*
Next, you need to add a Crontab job, running every minute, to handle certain Pterodactyl tasks, such as session cleanup and sending scheduled tasks to daemons. You'll want to open your crontab with sudo crontab -e and then paste the line below.
-
Open crontab file using below command
- sudo crontab -e In the opened file, insert the line: * * * * * php /var/www/pterodactyl/artisan schedule:run >> /dev/null 2>&1
Create a new systemd worker to have the queue process run in the background. This queue is responsible for sending emails and performing many other background tasks for Pterodactyl. Create a file called pteroq.service in /etc/systemd/system with the following content.
-
# Pterodactyl Queue Worker File
# ----------------------------------
[Unit]
Description=Pterodactyl Queue Worker
After=redis-server.service
[Service]
# On some systems the user and group might be different.
# Some systems use `apache` or `nginx` as the user and group.
User=www-data
Group=www-data
Restart=always
ExecStart=/usr/bin/php /var/www/pterodactyl/artisan queue:work --queue=high,standard,low --sleep=3 --tries=3
StartLimitInterval=180
StartLimitBurst=30
RestartSec=5s
[Install]
WantedBy=multi-user.target
Enable the redis-server and pteroq.service services, and also configure them to autoload when the server OS boots.
- sudo systemctl enable --now redis-server
- sudo systemctl enable --now pteroq.service
Web server configuration
Let's look at setting up using NGINX as a web server. First remove the default NGINX configuration.
- rm /etc/nginx/sites-enabled/default
Create a file called pterodactyl.conf in the /etc/nginx/sites-available/ directory and paste the following contents (replace
File contents for NGINX without SSL
-
server {
# Replace the example
File contents for NGINX with SSL
-
server_tokens off;
server {
listen 80;
server_name
Enable NGINX configuration and restart it
- sudo ln -s /etc/nginx/sites-available/pterodactyl.conf /etc/nginx/sites-enabled/pterodactyl.conf
- sudo systemctl restart nginx
Installation of Wings
Wings is the next generation server control panel from Pterodactyl. To run Wings, you will need to install Docker on the server. To quickly install Docker CE, you can run the below command.
- curl -sSL https://get.docker.com/ | CHANNEL=stable bash
Run the command below to make Docker start when your server boots.
- sudo systemctl enable --now docker
On most systems, Docker will not be able to configure swap space by default. Enabling paging is completely optional, but we recommend doing so to prevent OOM errors. To enable swap, open /etc/default/grub as root and look for the line starting with GRUB_CMDLINE_LINUX_DEFAULT. Make sure the line contains swapaccount=1.
-
GRUB_CMDLINE_LINUX_DEFAULT="swapaccount=1"
After this, run the grub update, then reboot the server and enable swap.
- sudo update-grub
- sudo reboot
To install Wings, run the commands below, which will create a base directory and download the wings executable.
- sudo mkdir -p /etc/pterodactyl
- curl -L -o /usr/local/bin/wings "https://github.com/pterodactyl/wings/releases/latest/download/wings_linux_$([[ "$(uname -m)" == "x86_64" ]] && echo "amd64" || echo "arm64")"
- sudo chmod u+x /usr/local/bin/wings
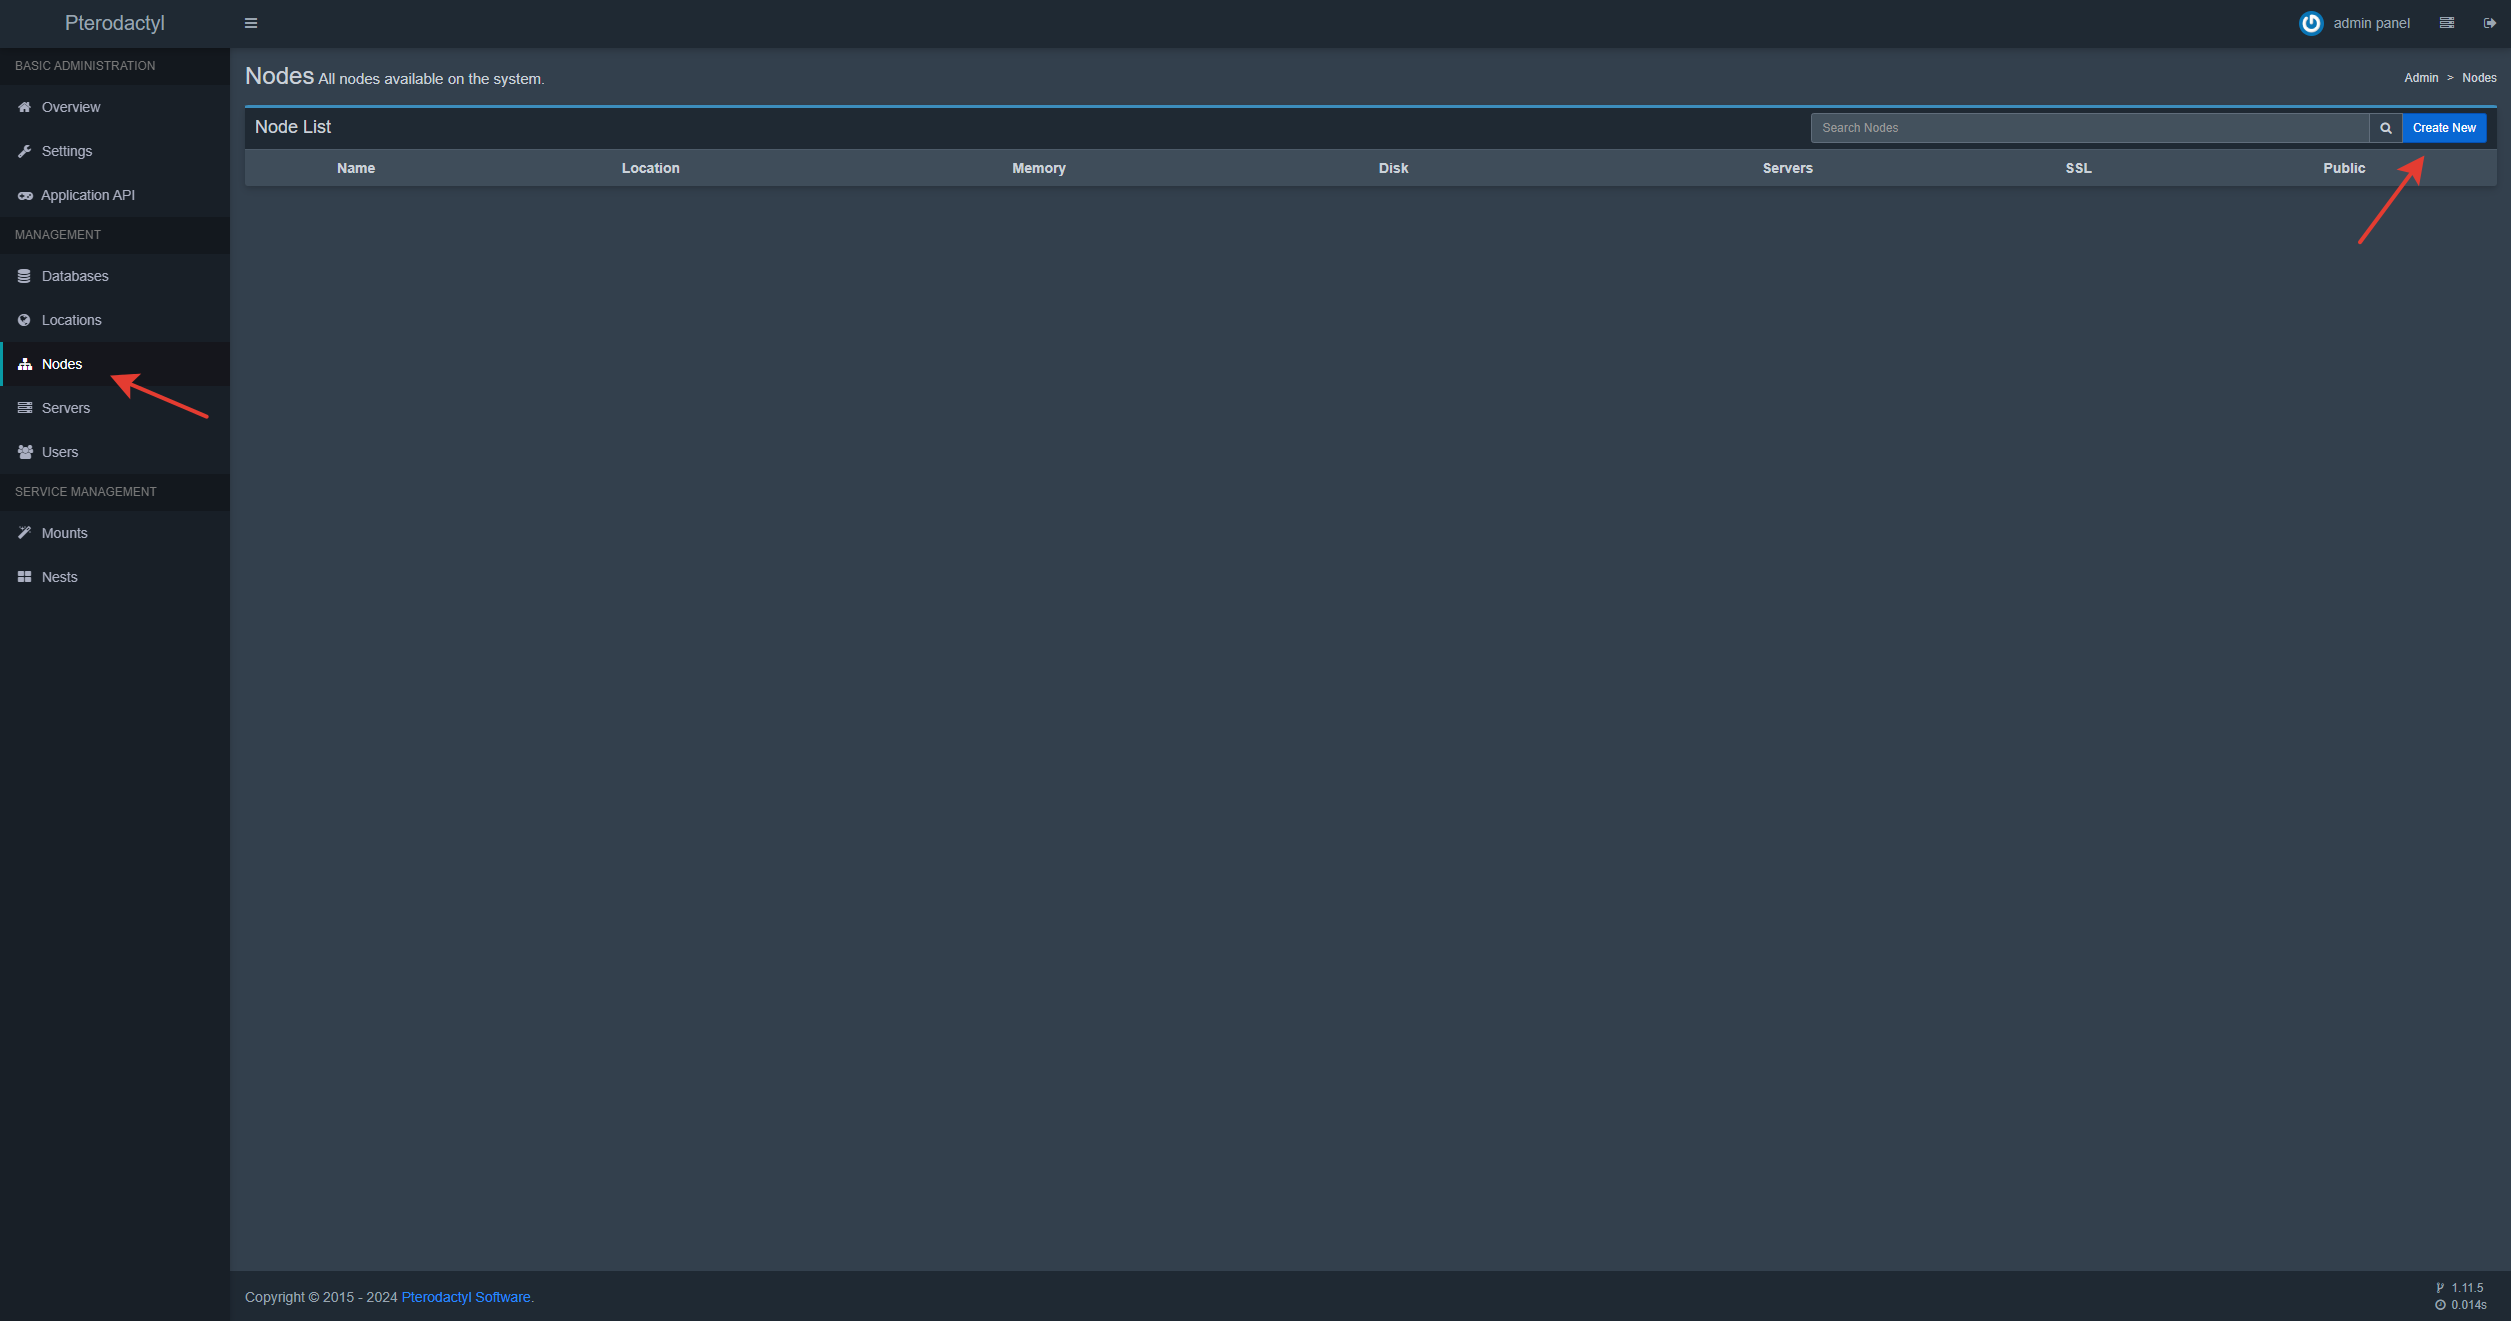
Creating a node in the Pterodactyl panel
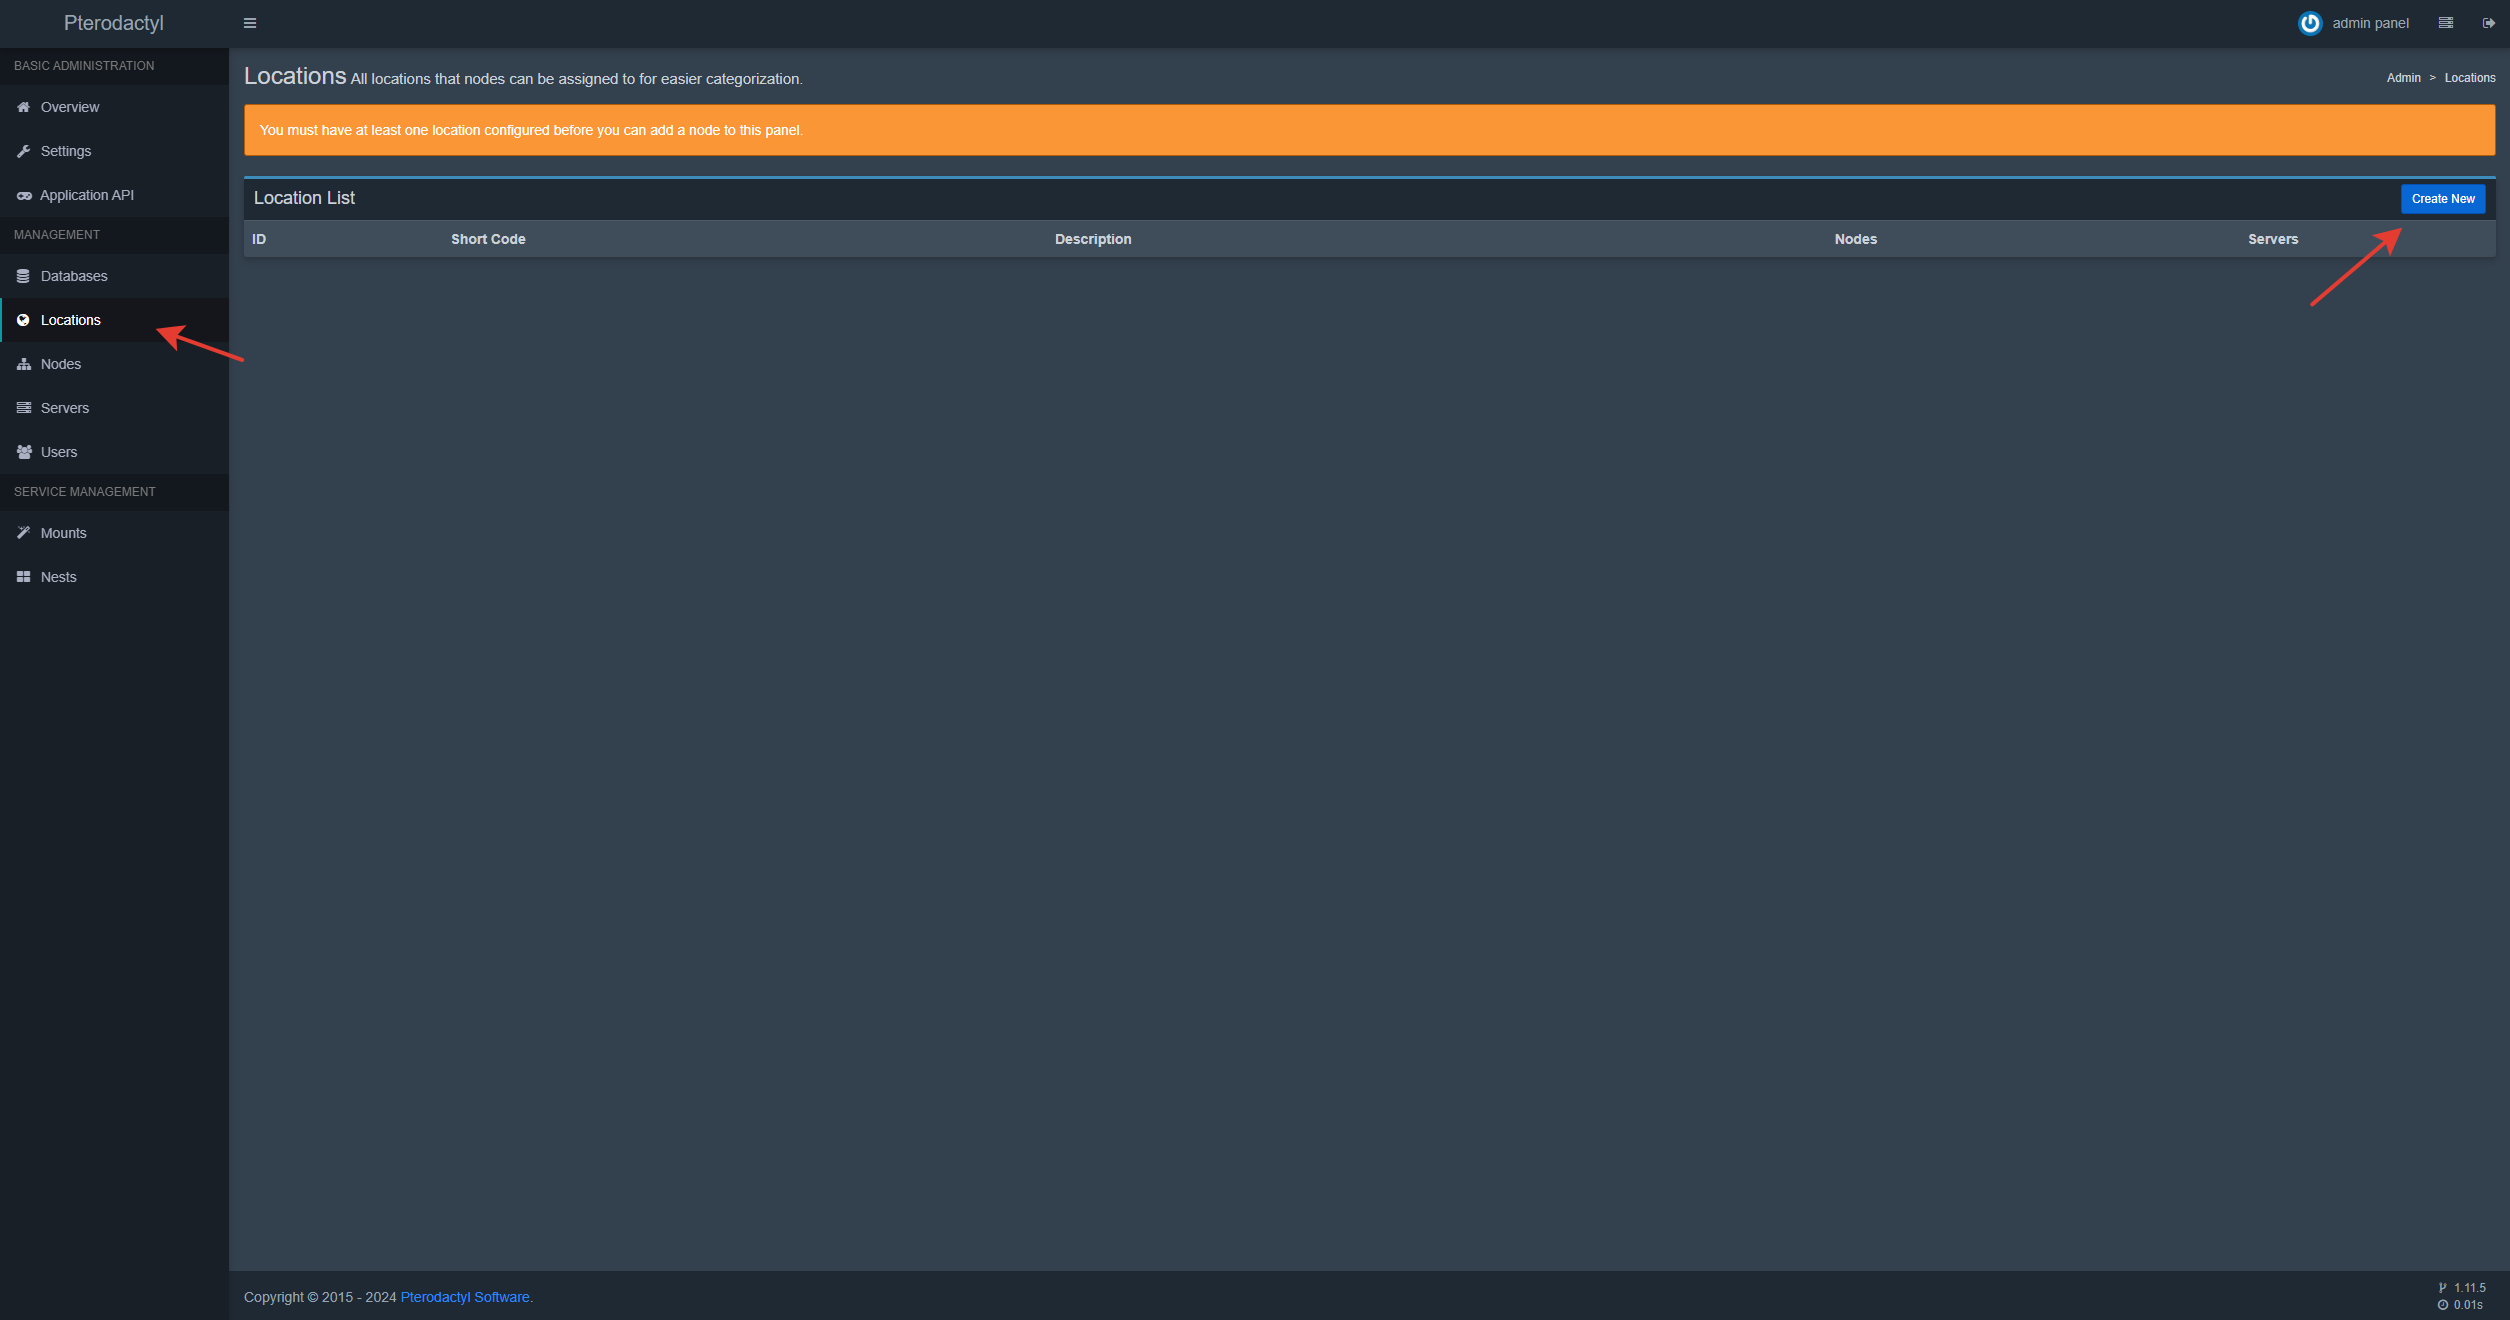
After installing Wings and the necessary components, the next step is to create a node on the installed panel. Go to the administrative view of the panel, select Nodes in the sidebar and click the Create New button on the right.
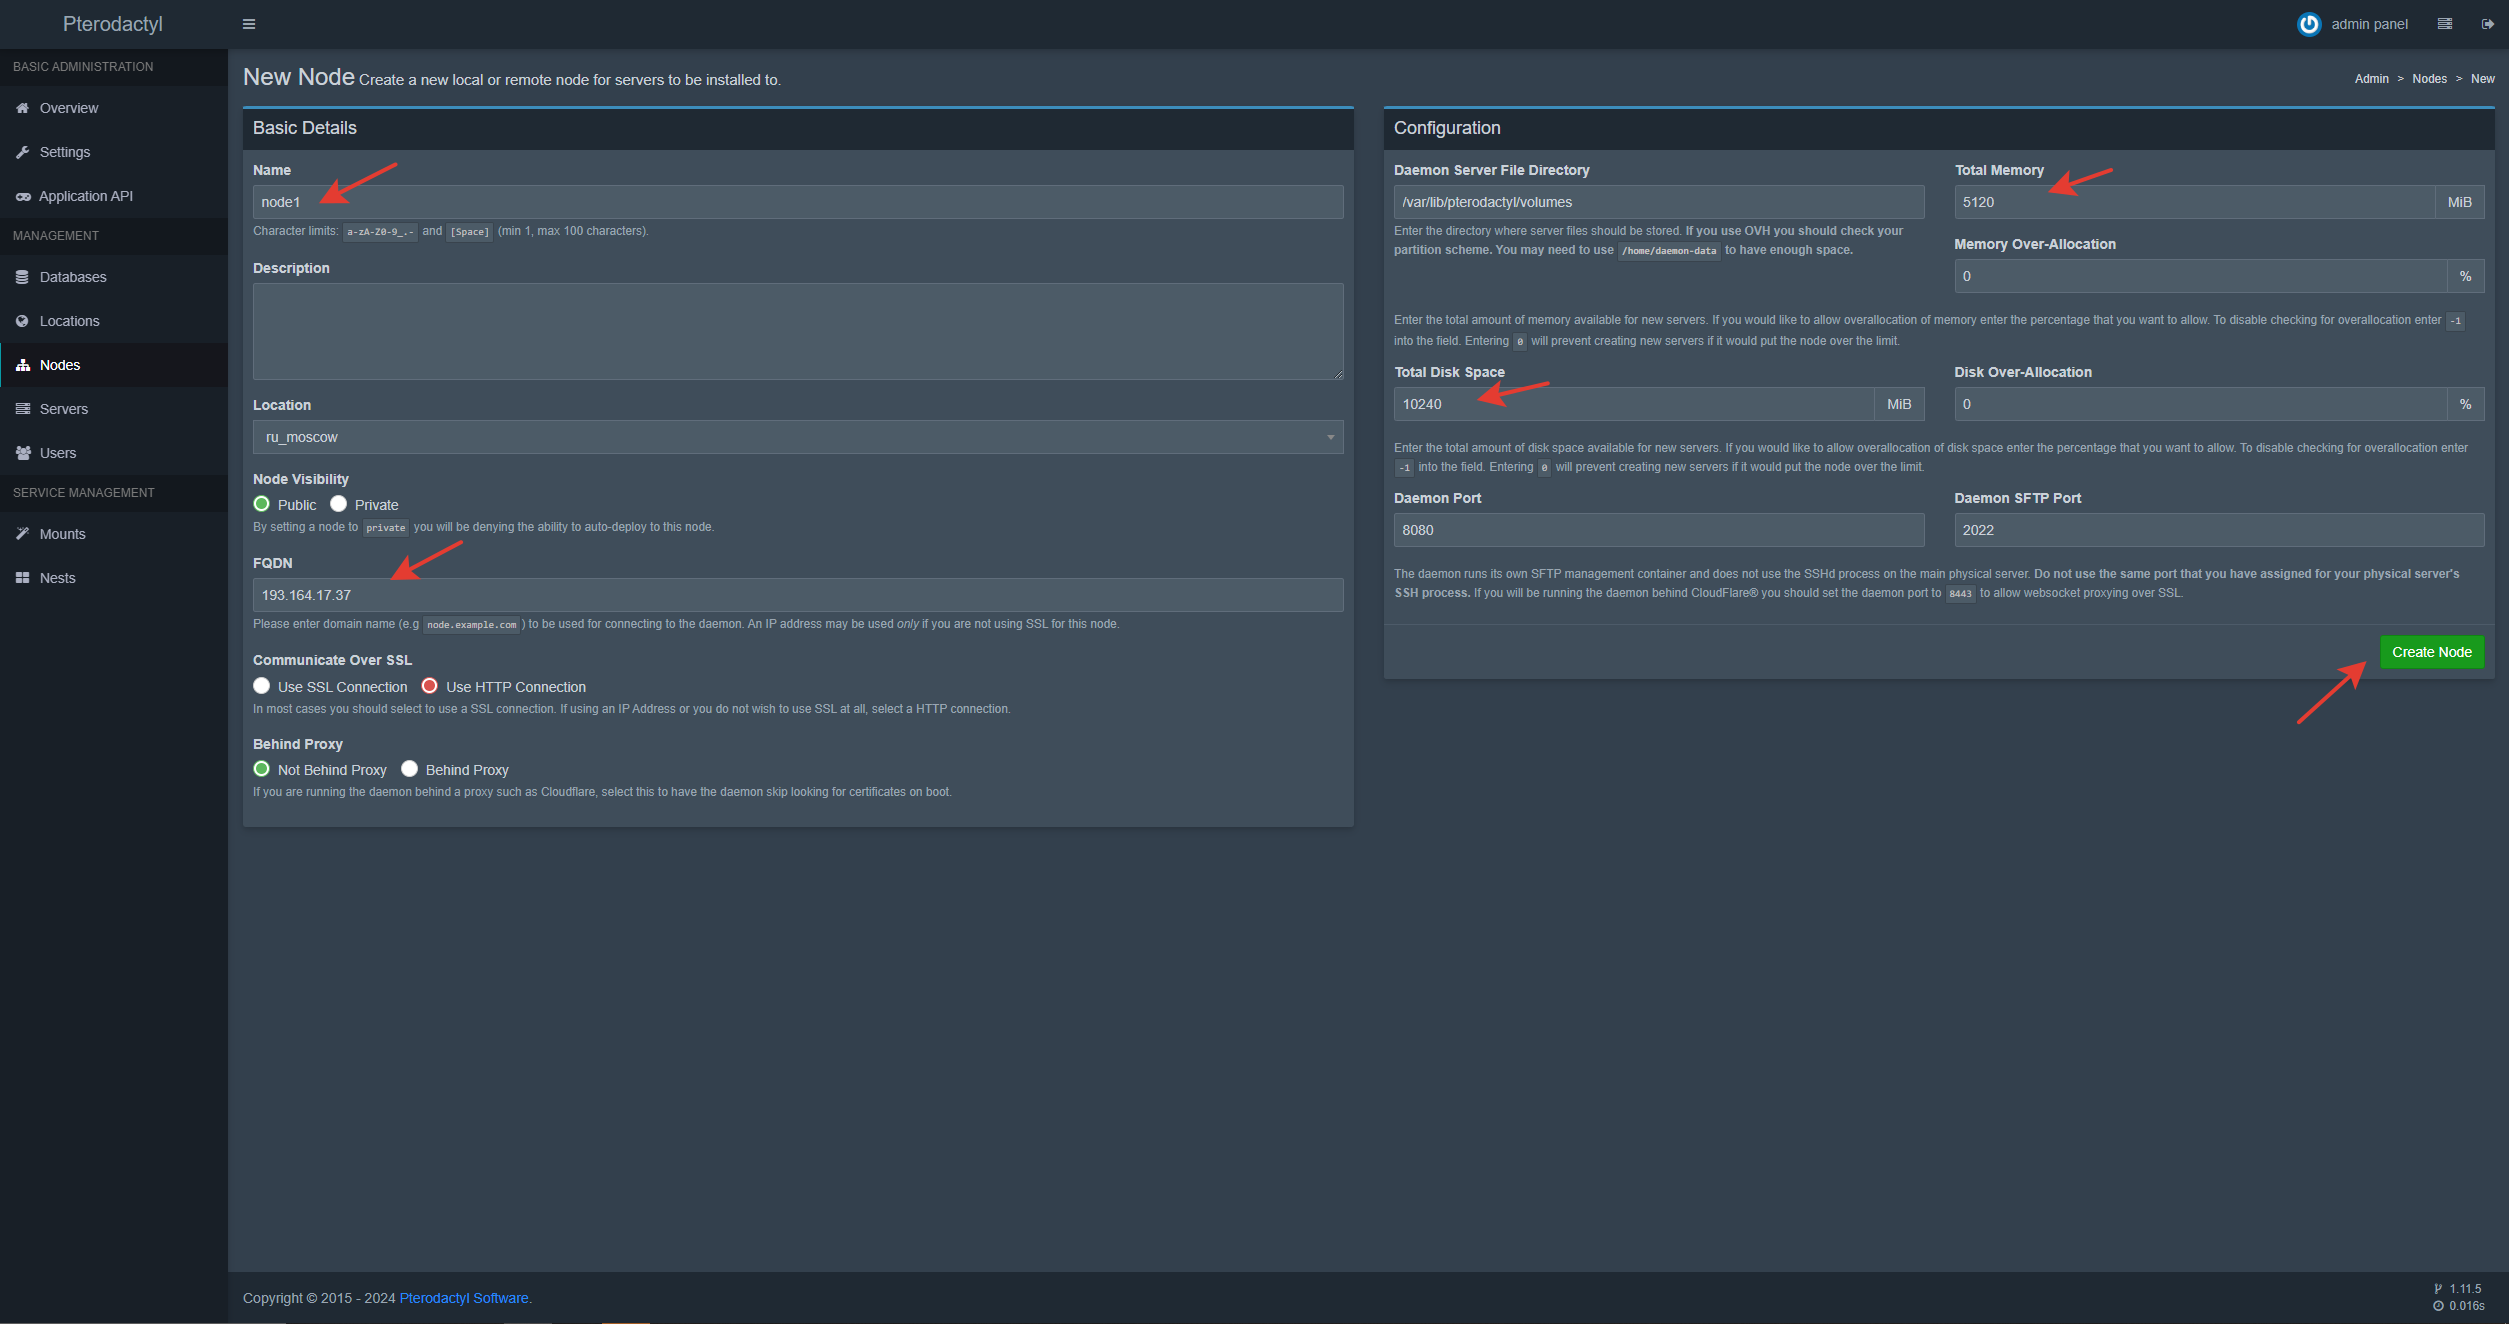
The system will prompt you to create a Location. When adding a location, you can specify a custom name.

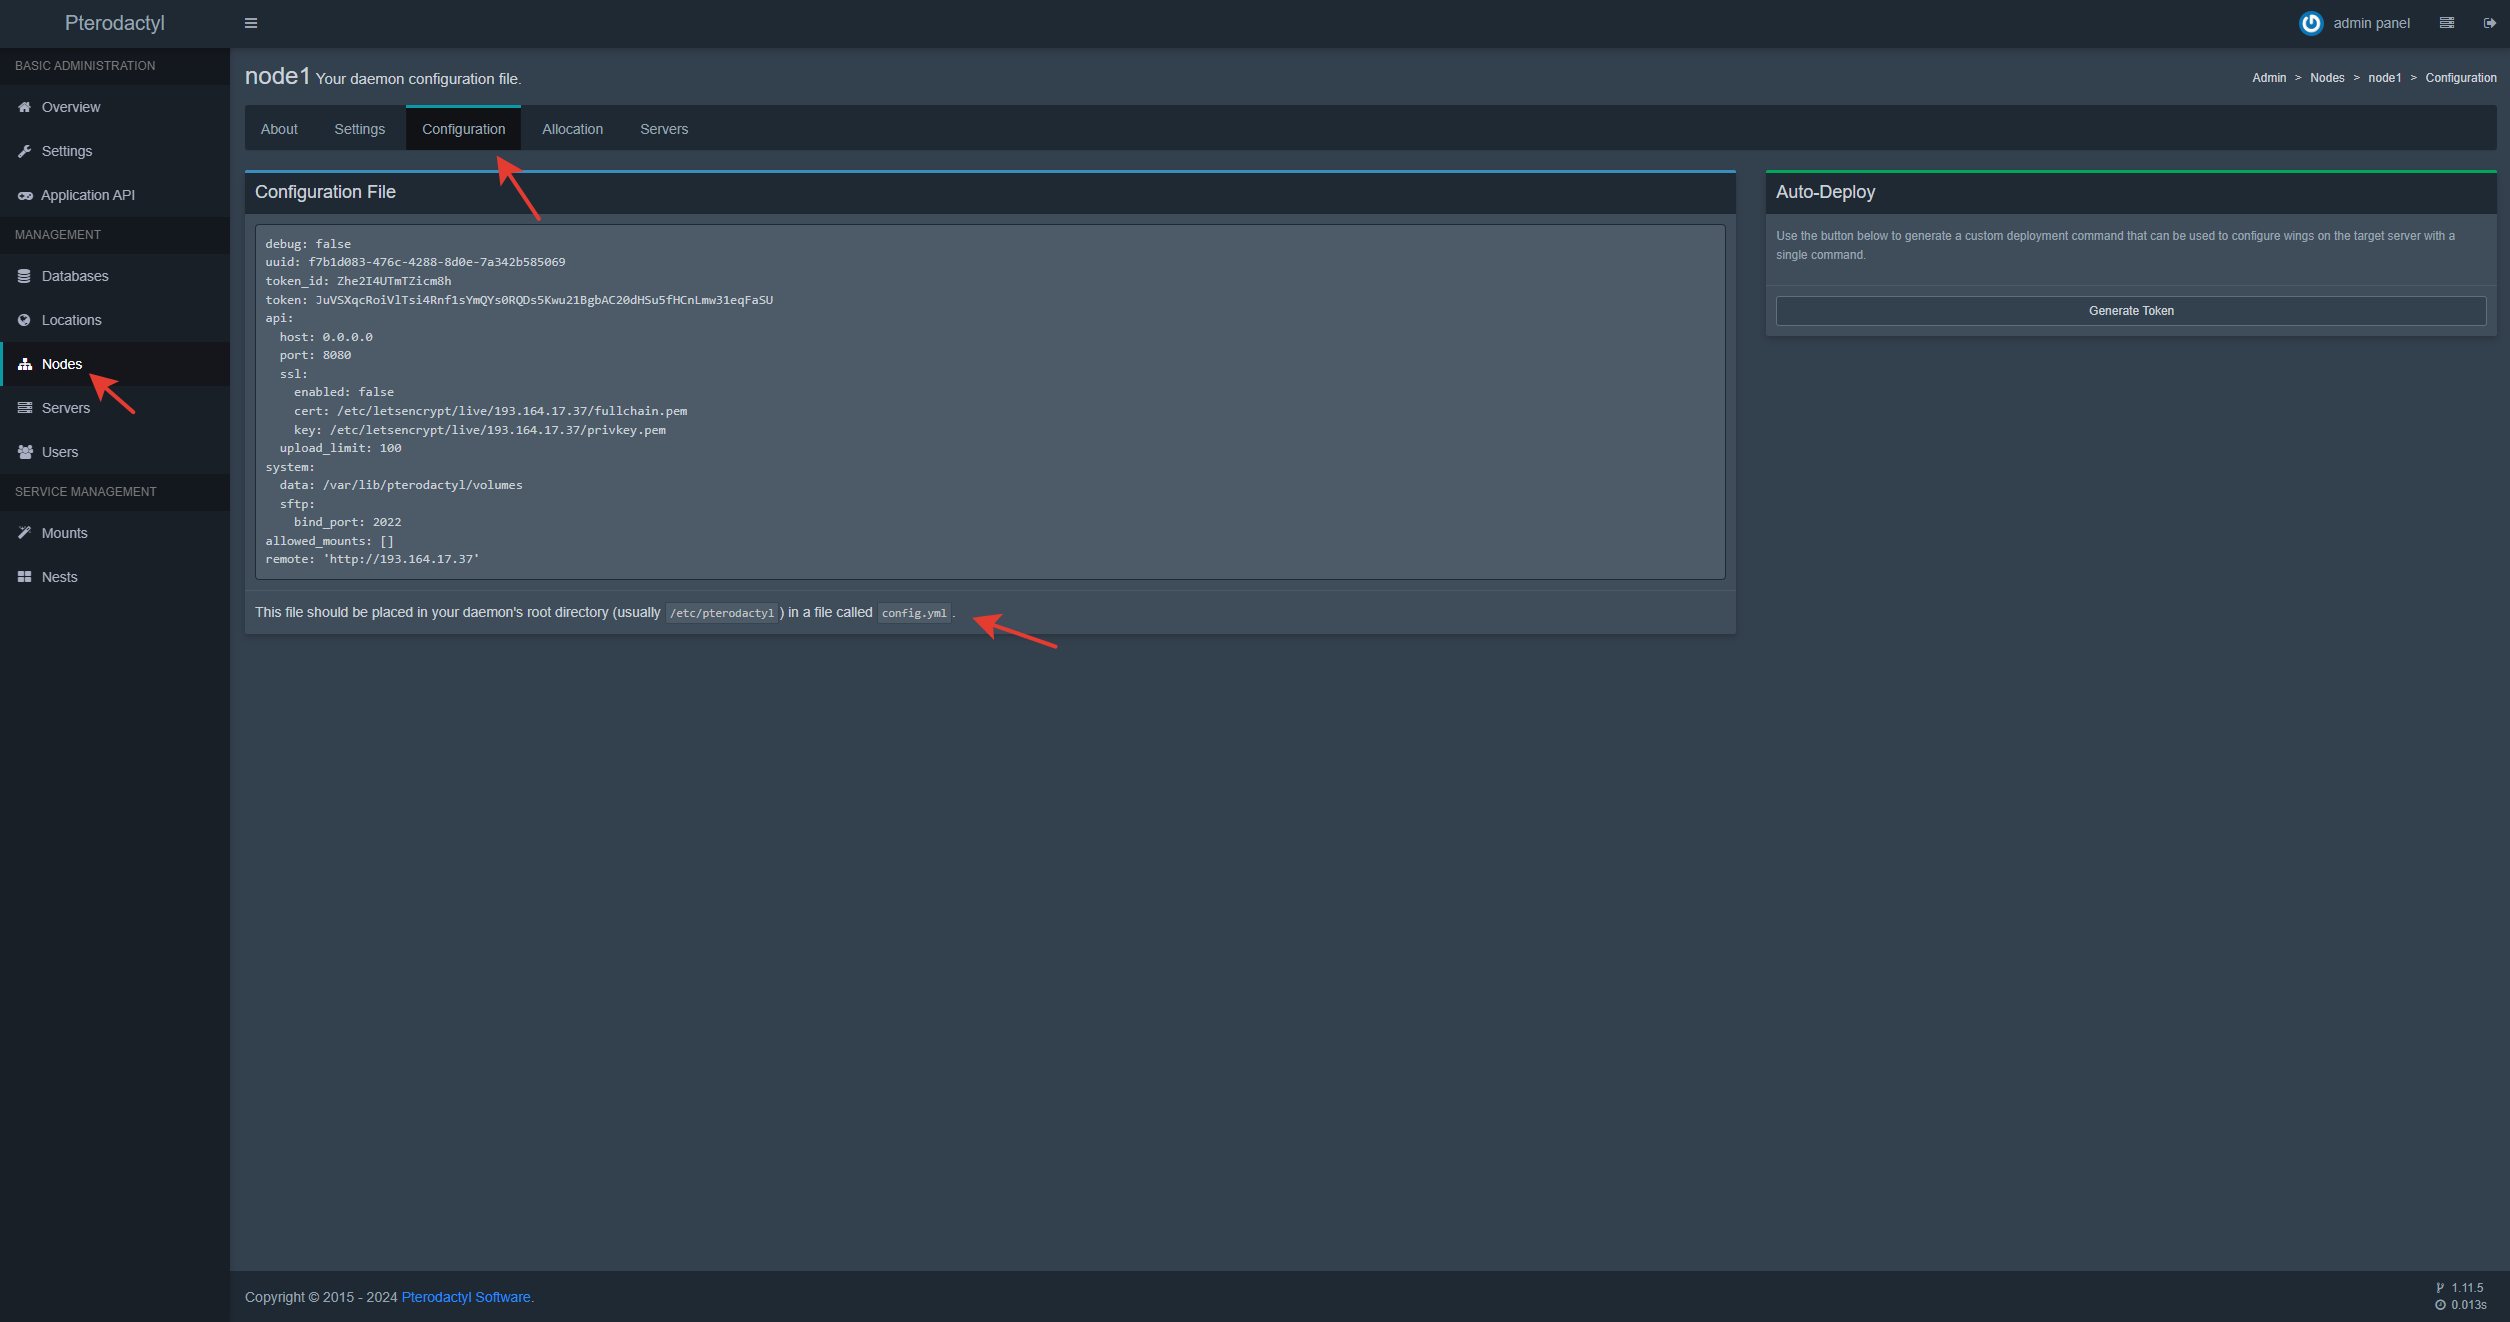
After adding a location, you can return to creating a node. Fill in the valid parameters and complete node creation. Then click on the created node and open the Configuration tab. You need to copy the configuration code and place it in the config.yml file, which must be created in the /etc/pterodactyl/ directory.
Запуск Wings
To launch Wings, run the command below in the console. Once you are sure that the program runs without errors, use CTRL+C to terminate the process.
- sudo wings --debug
If Wings launched without errors, you can run it in the background. To do this, create a file named wings.service in the /etc/systemd/system/ directory with the following contents.
-
[Unit]
Description=Pterodactyl Wings Daemon
After=docker.service
Requires=docker.service
PartOf=docker.service
[Service]
User=root
WorkingDirectory=/etc/pterodactyl
LimitNOFILE=4096
PIDFile=/var/run/wings/daemon.pid
ExecStart=/usr/local/bin/wings
Restart=on-failure
StartLimitInterval=180
StartLimitBurst=30
RestartSec=5s
[Install]
WantedBy=multi-user.target
Then run the command below to restart systemd and start Wings.
- systemctl enable --now wings
Creating a game server
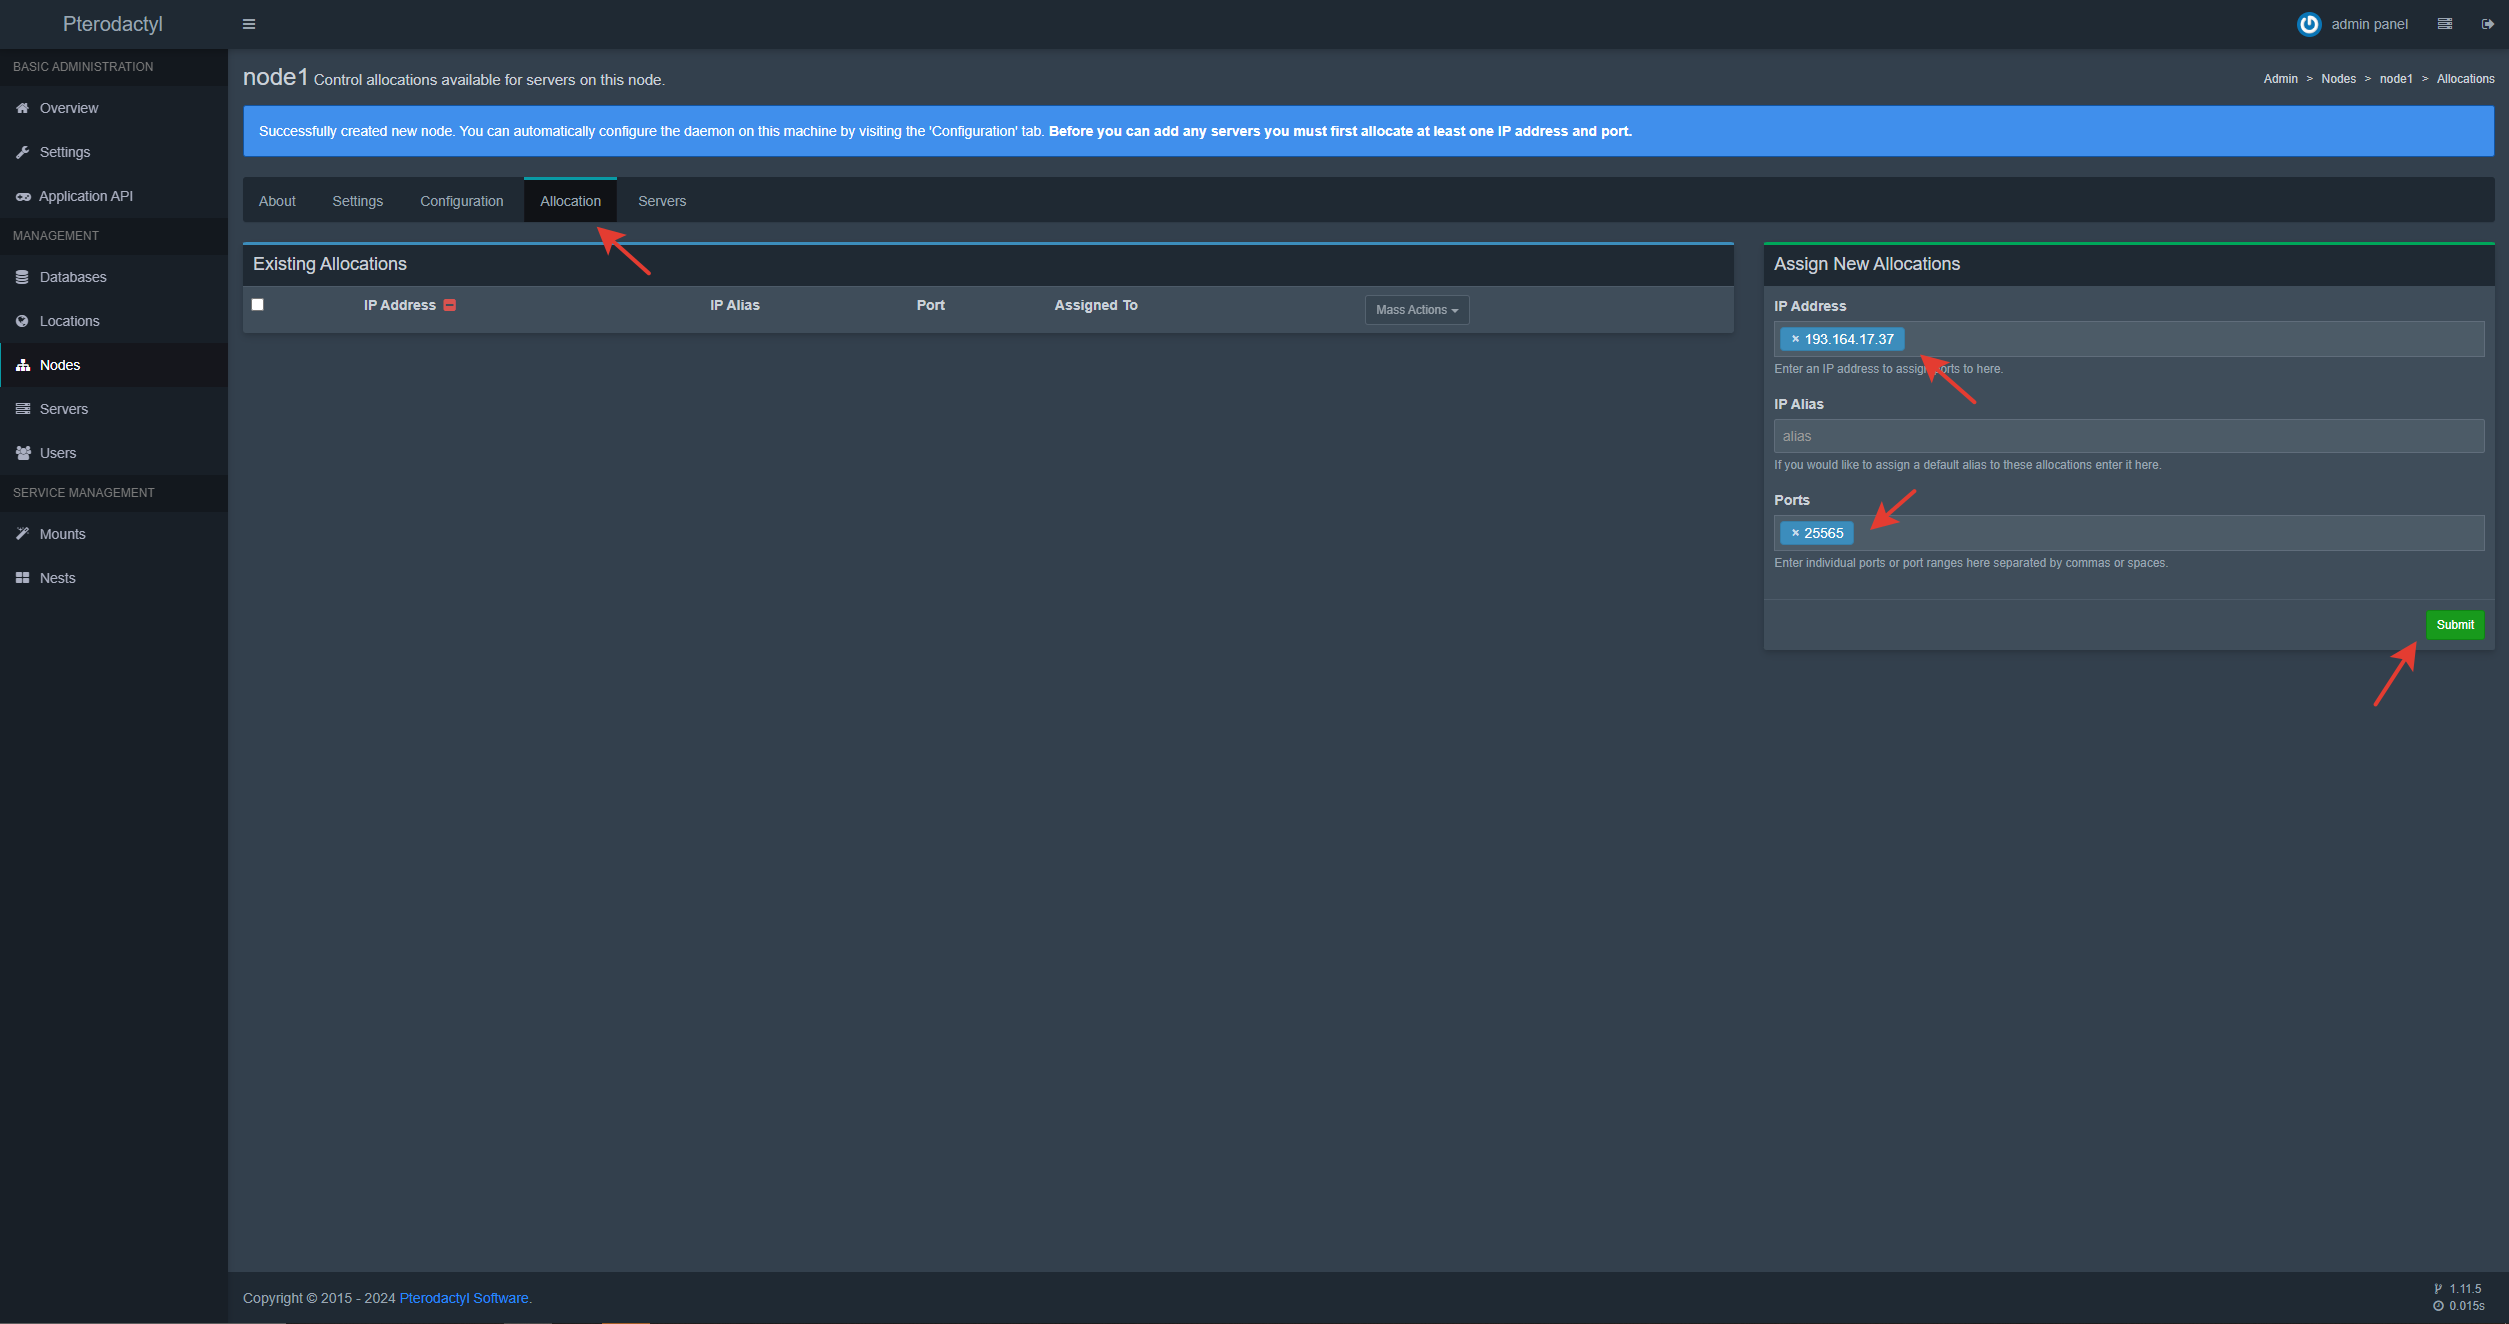
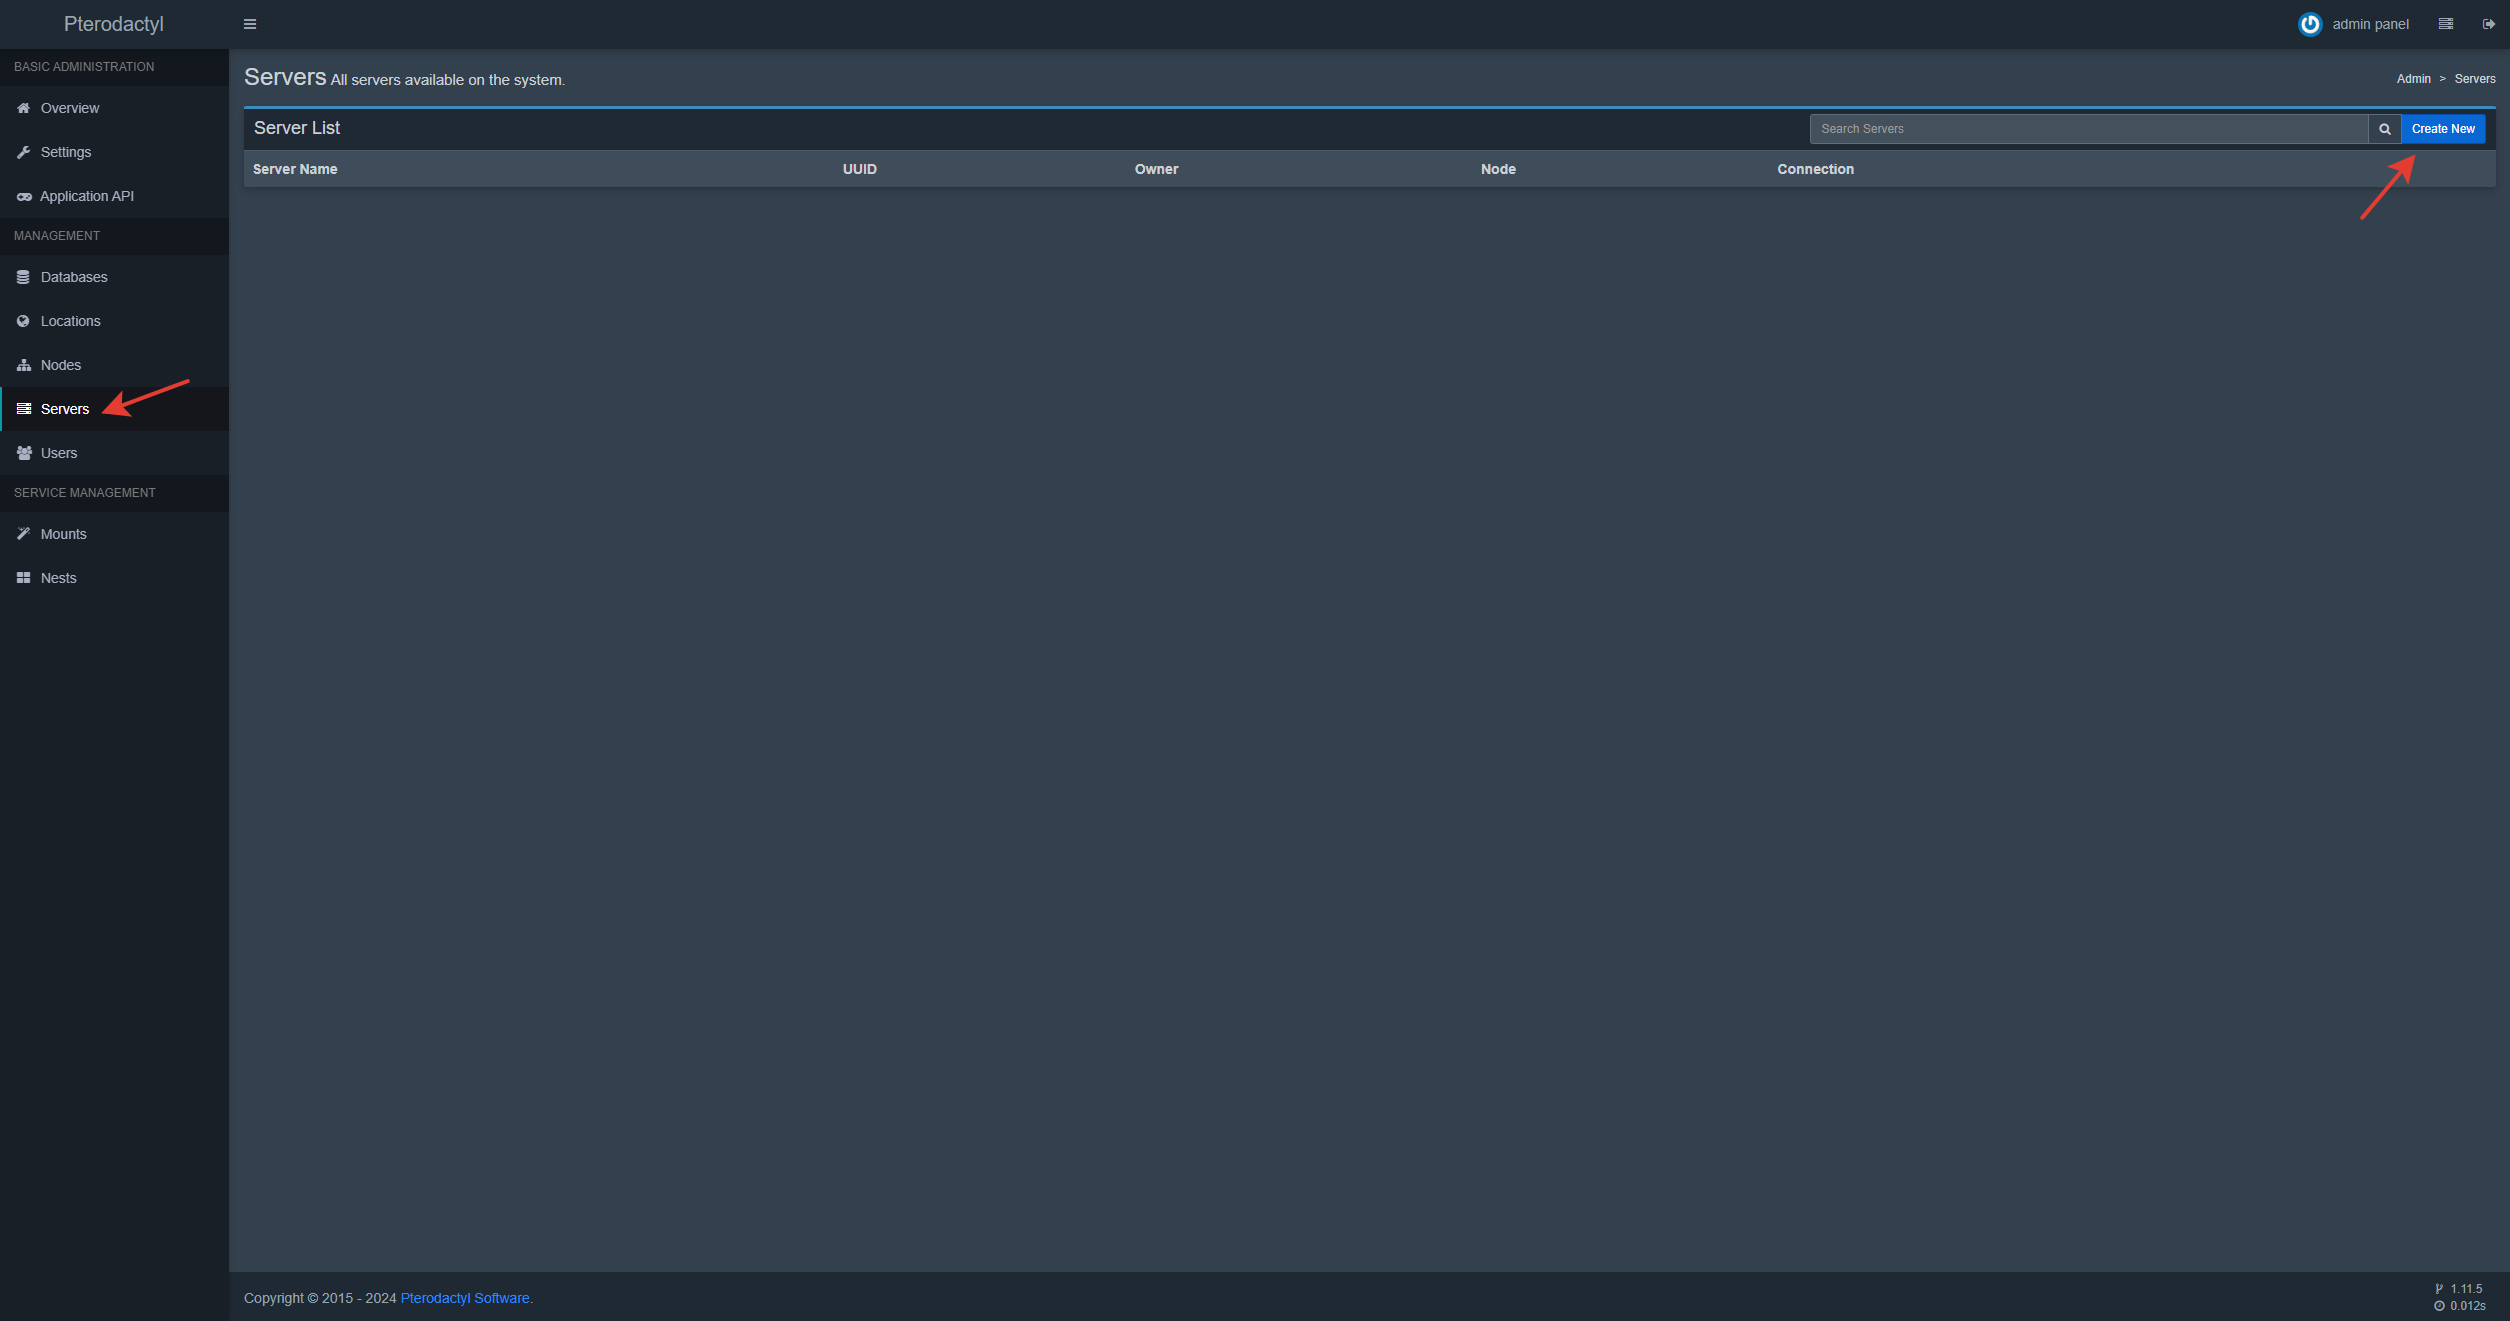
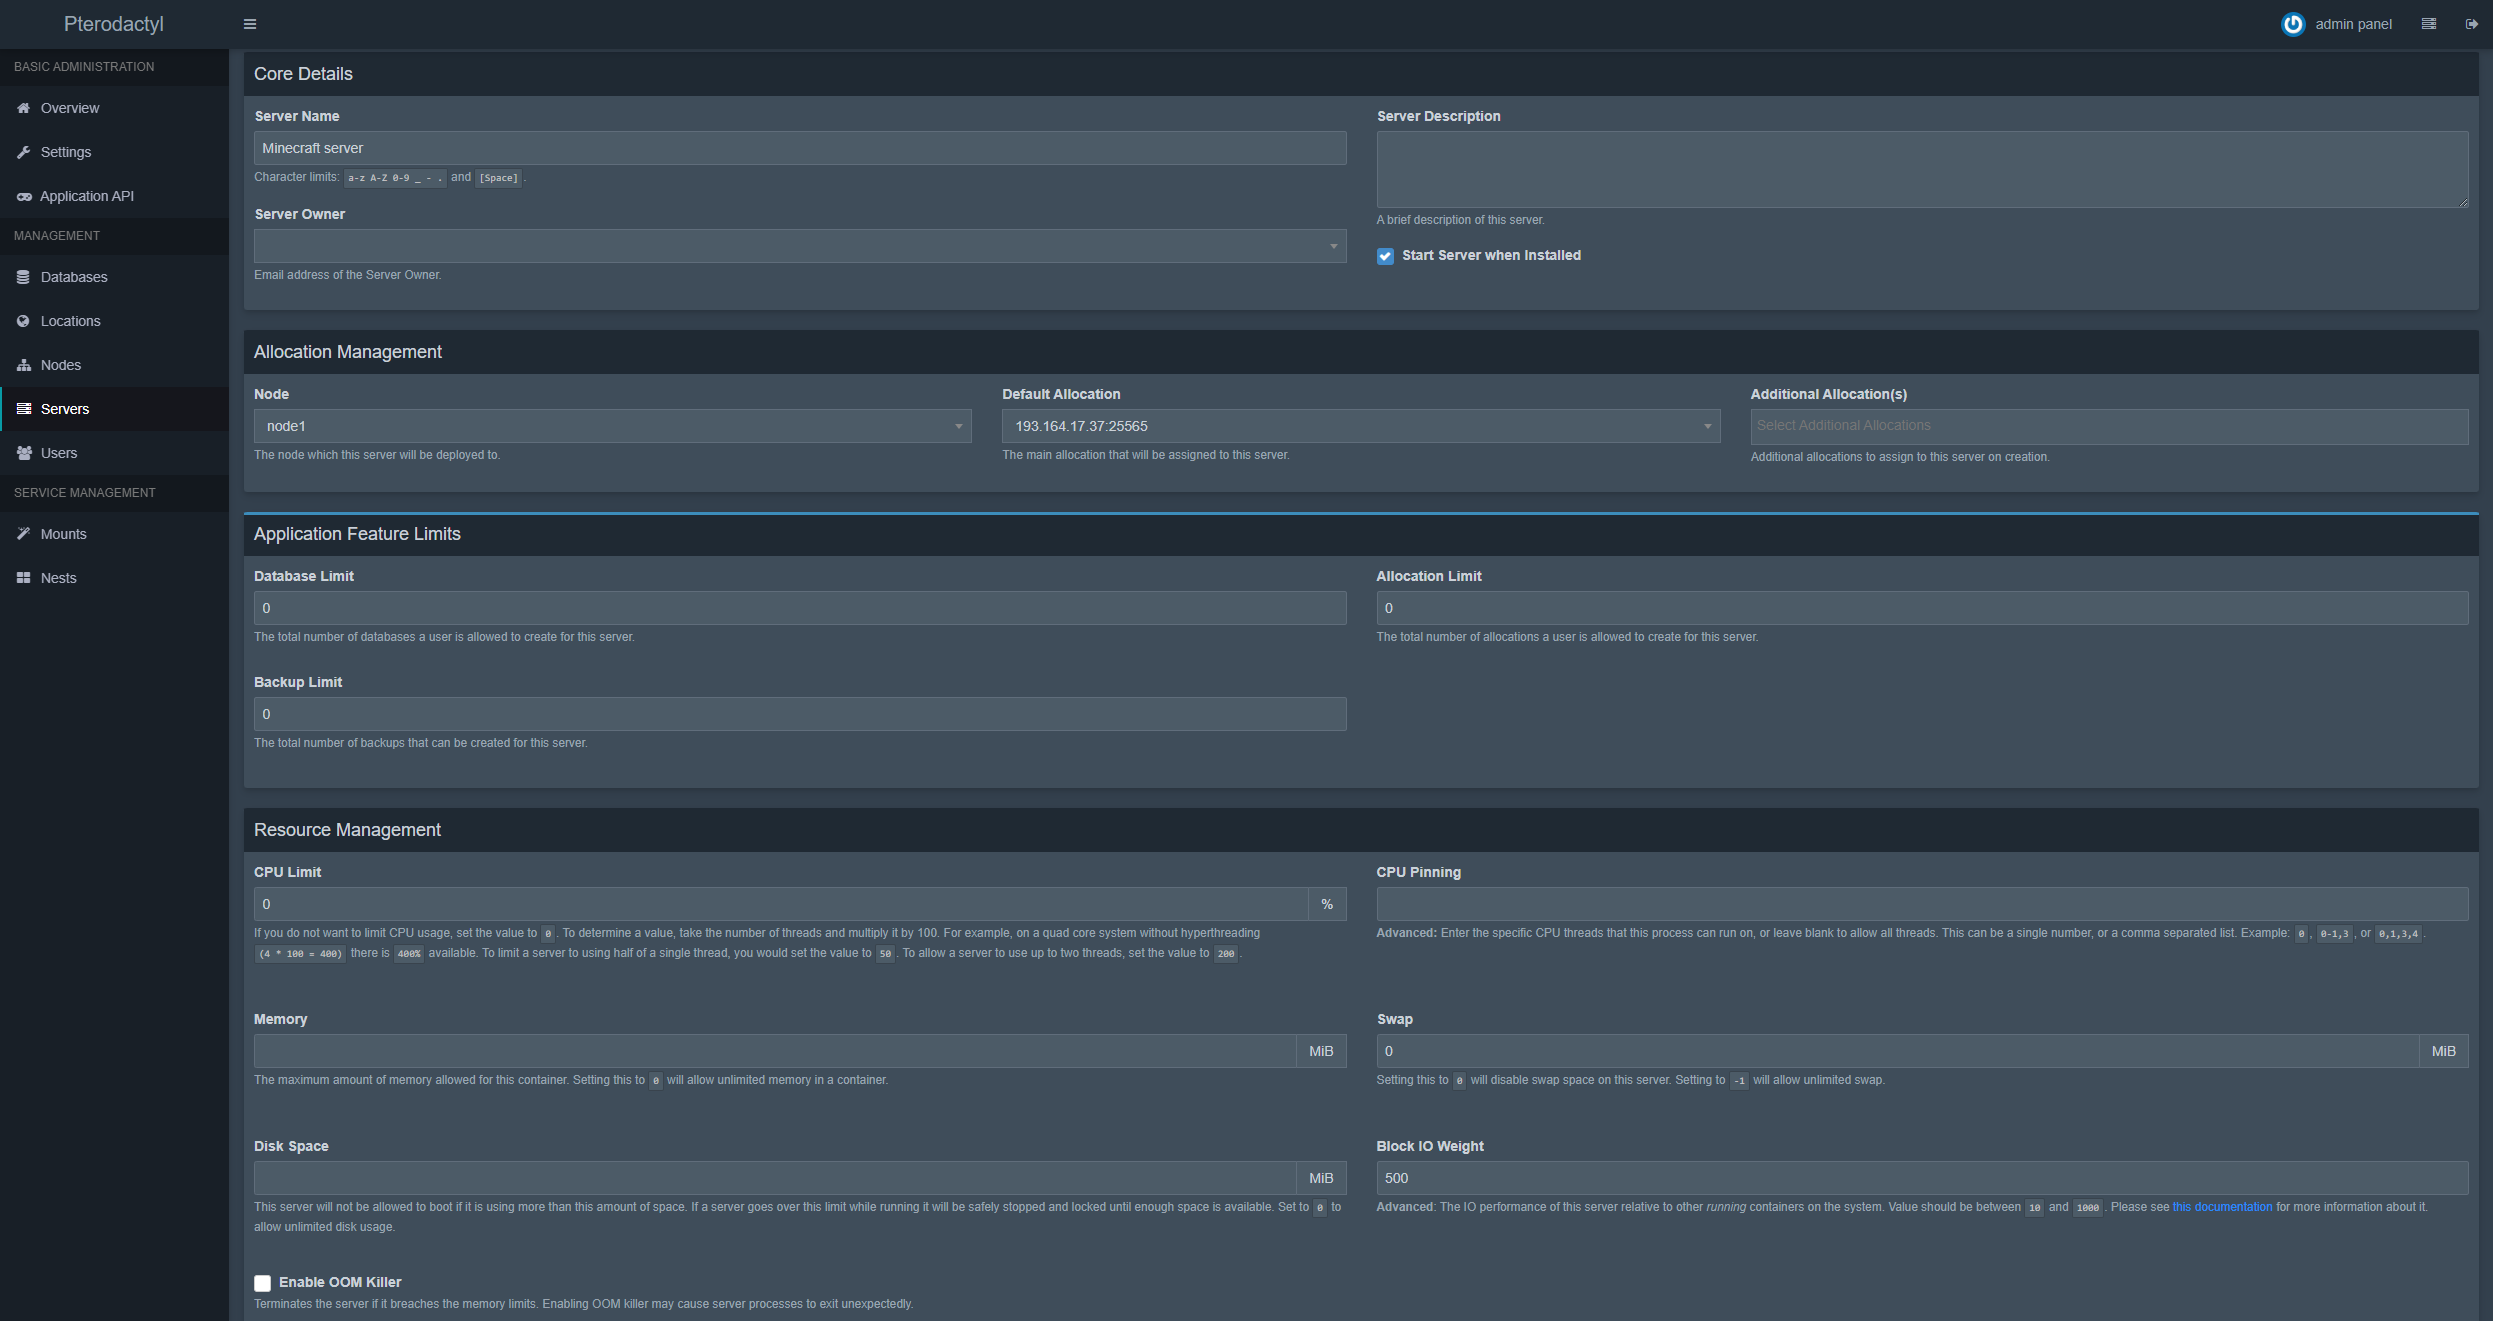
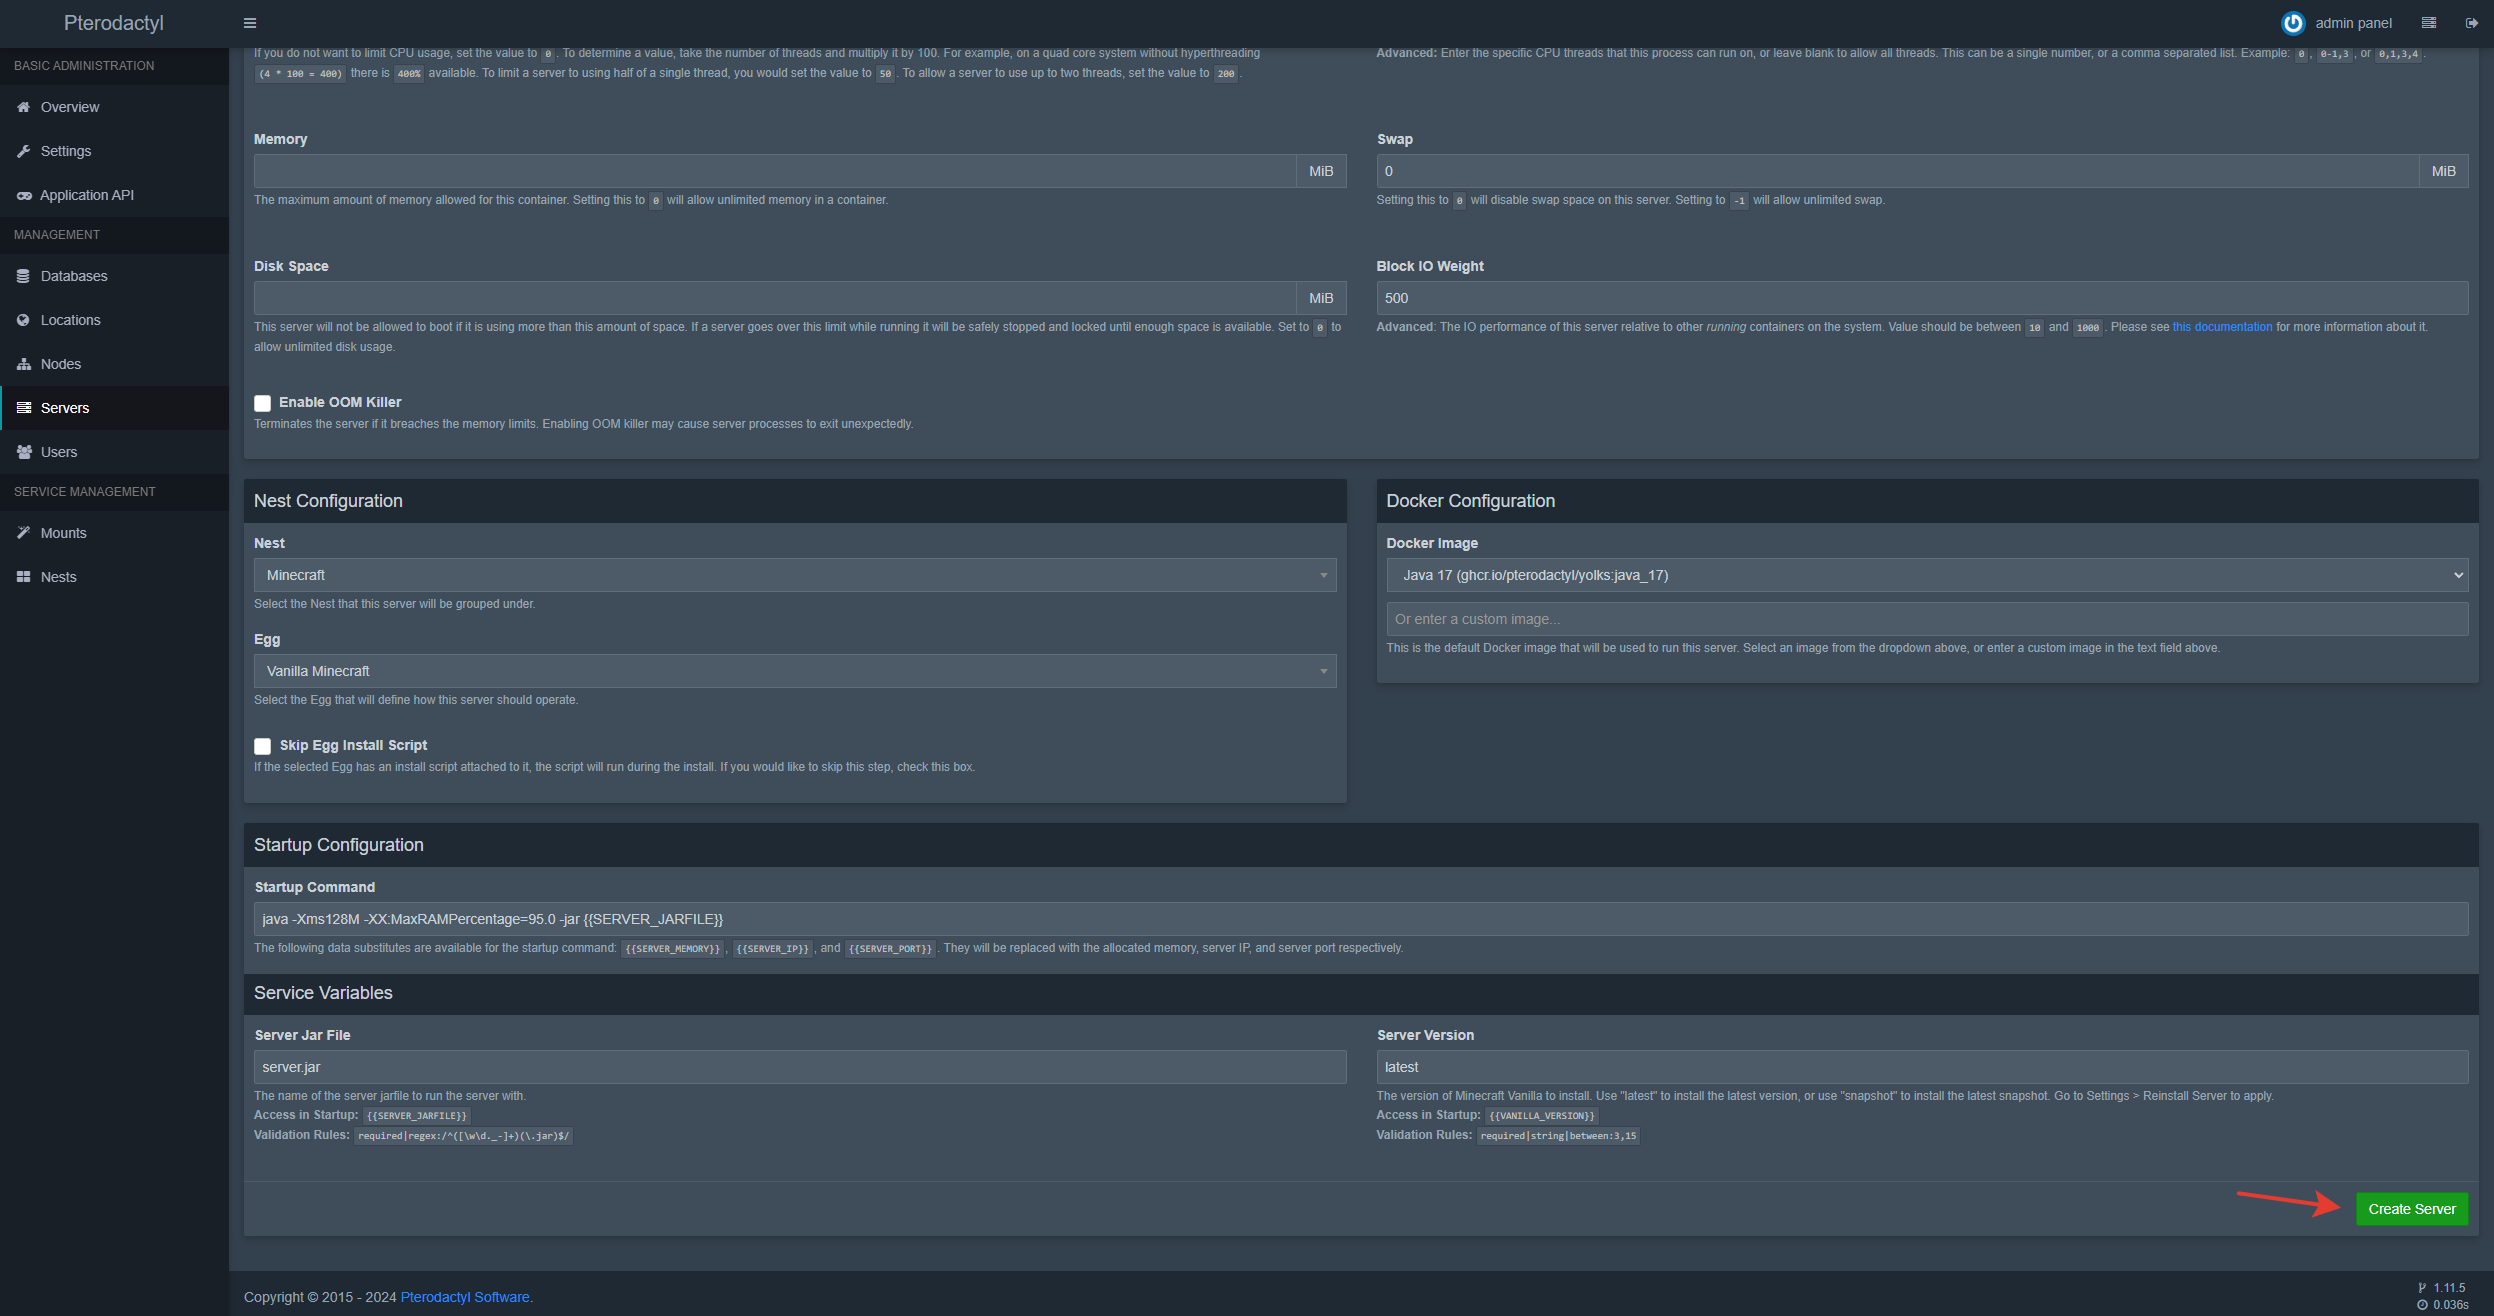
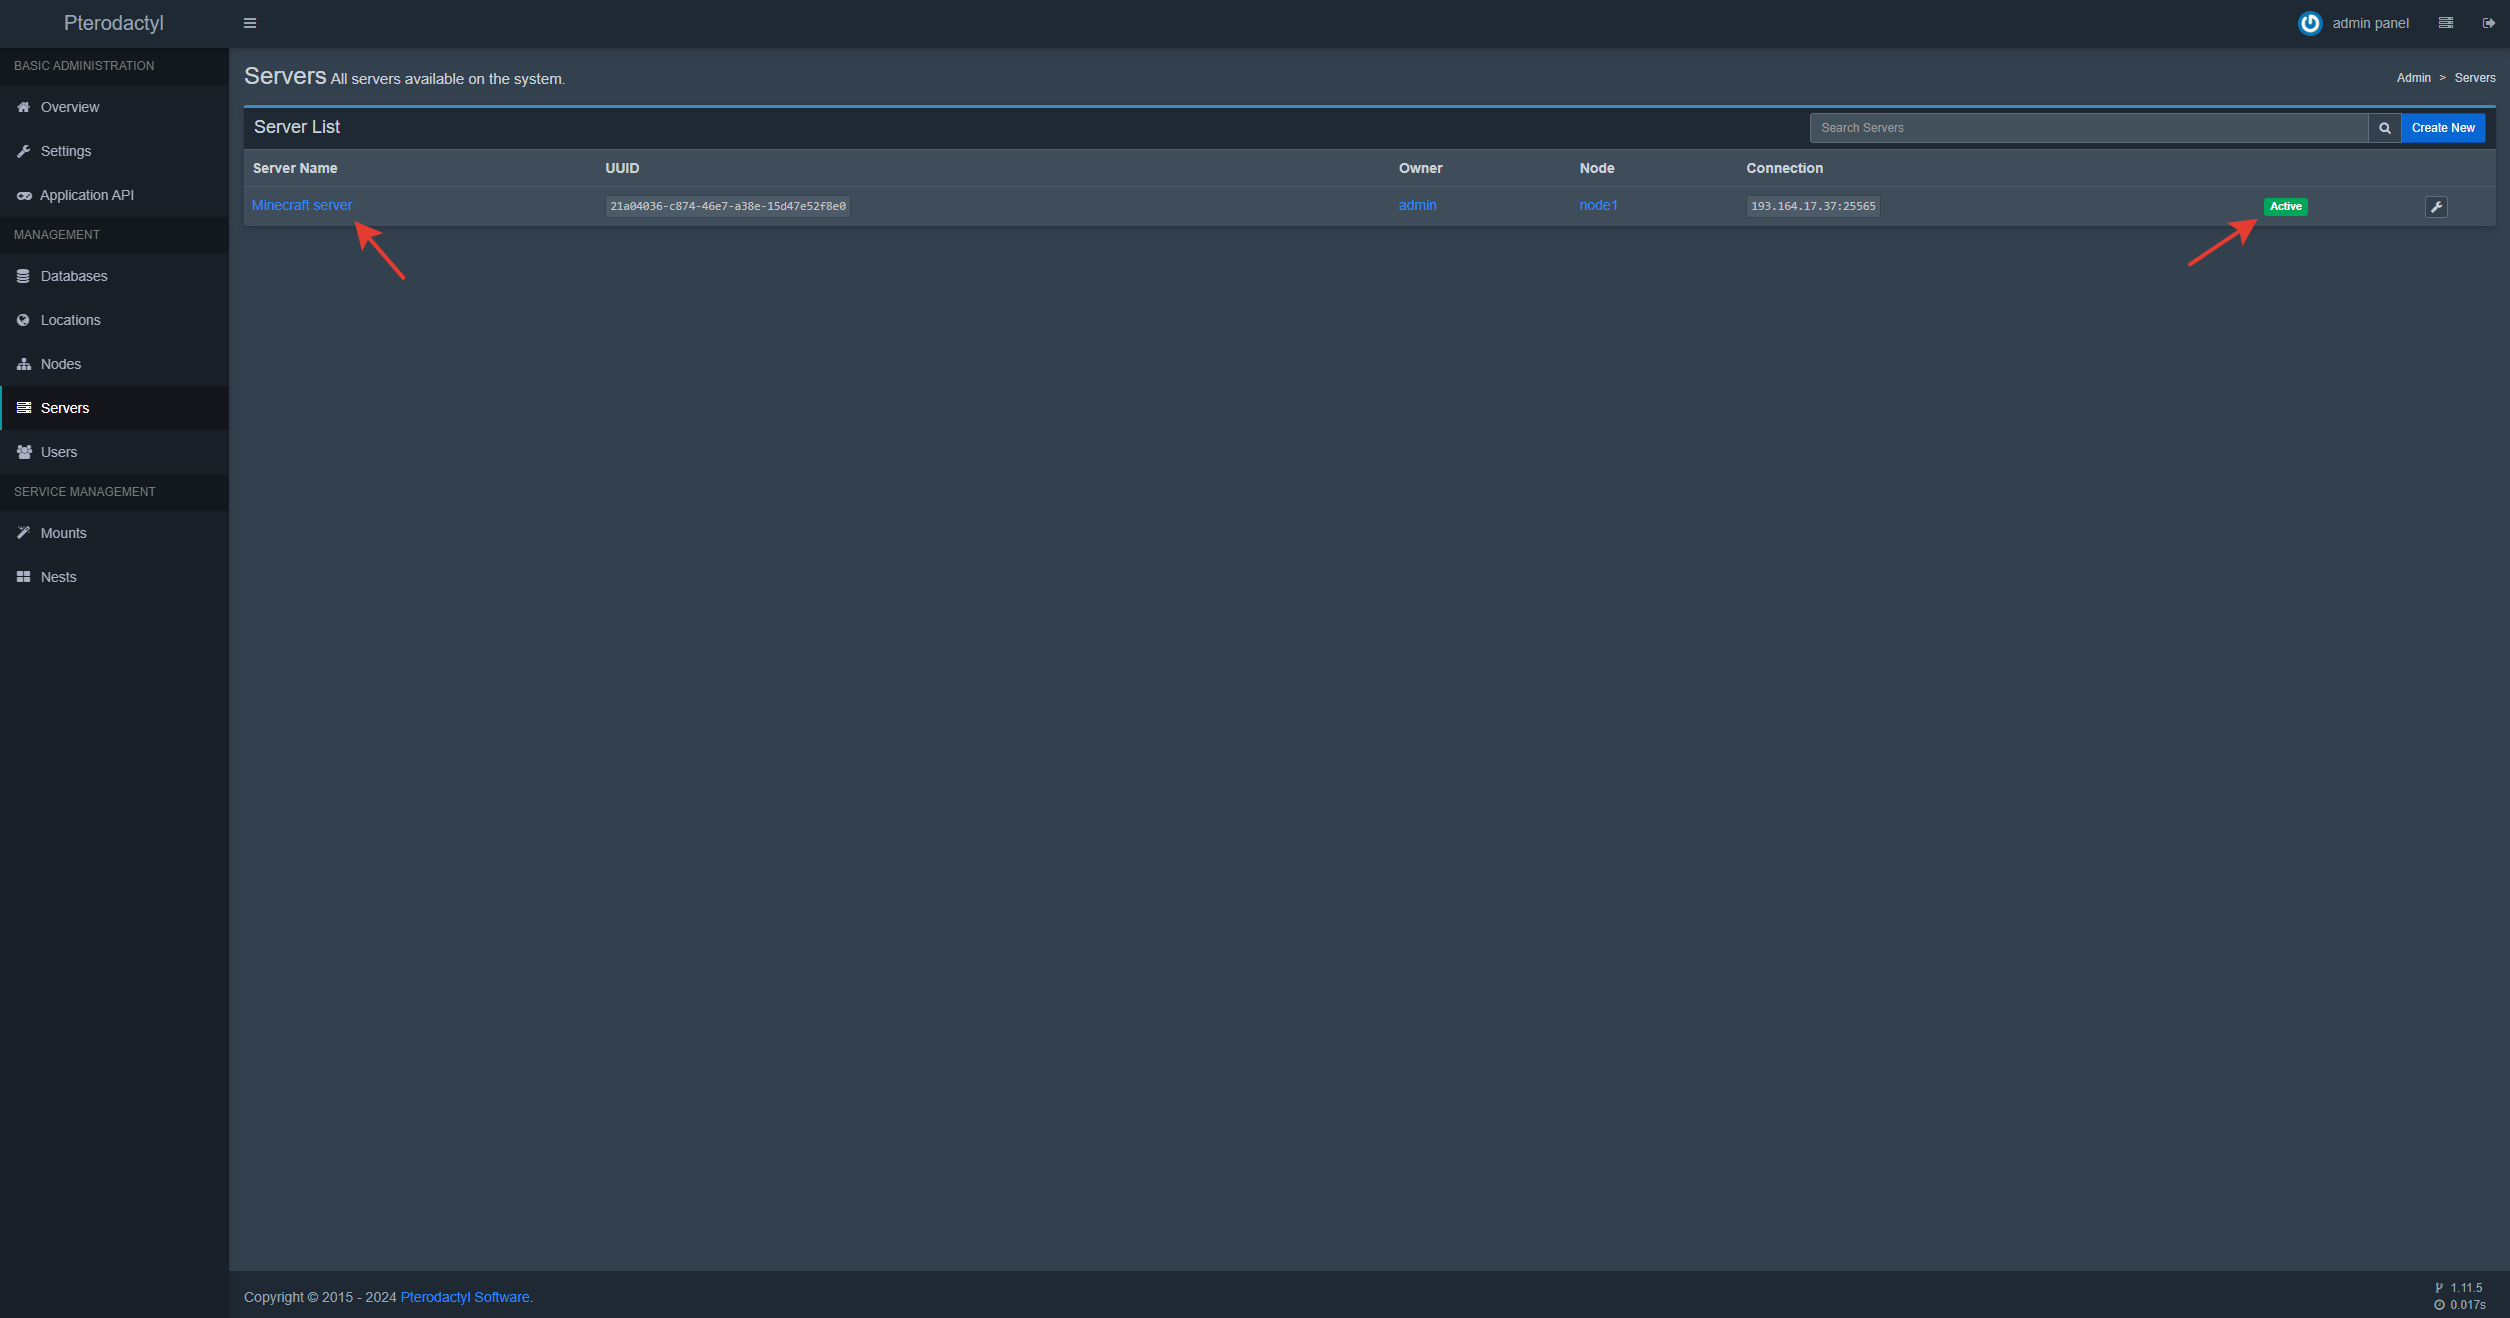
Let's look at creating a game server in Pterodactyl, using Minecraft as an example. First, you need to add Allocation to the node properties, specify the IP address and port that will be used by the game server. Then go to the Servers section and add a new server with the necessary parameters, the screenshots show an example of adding a server.
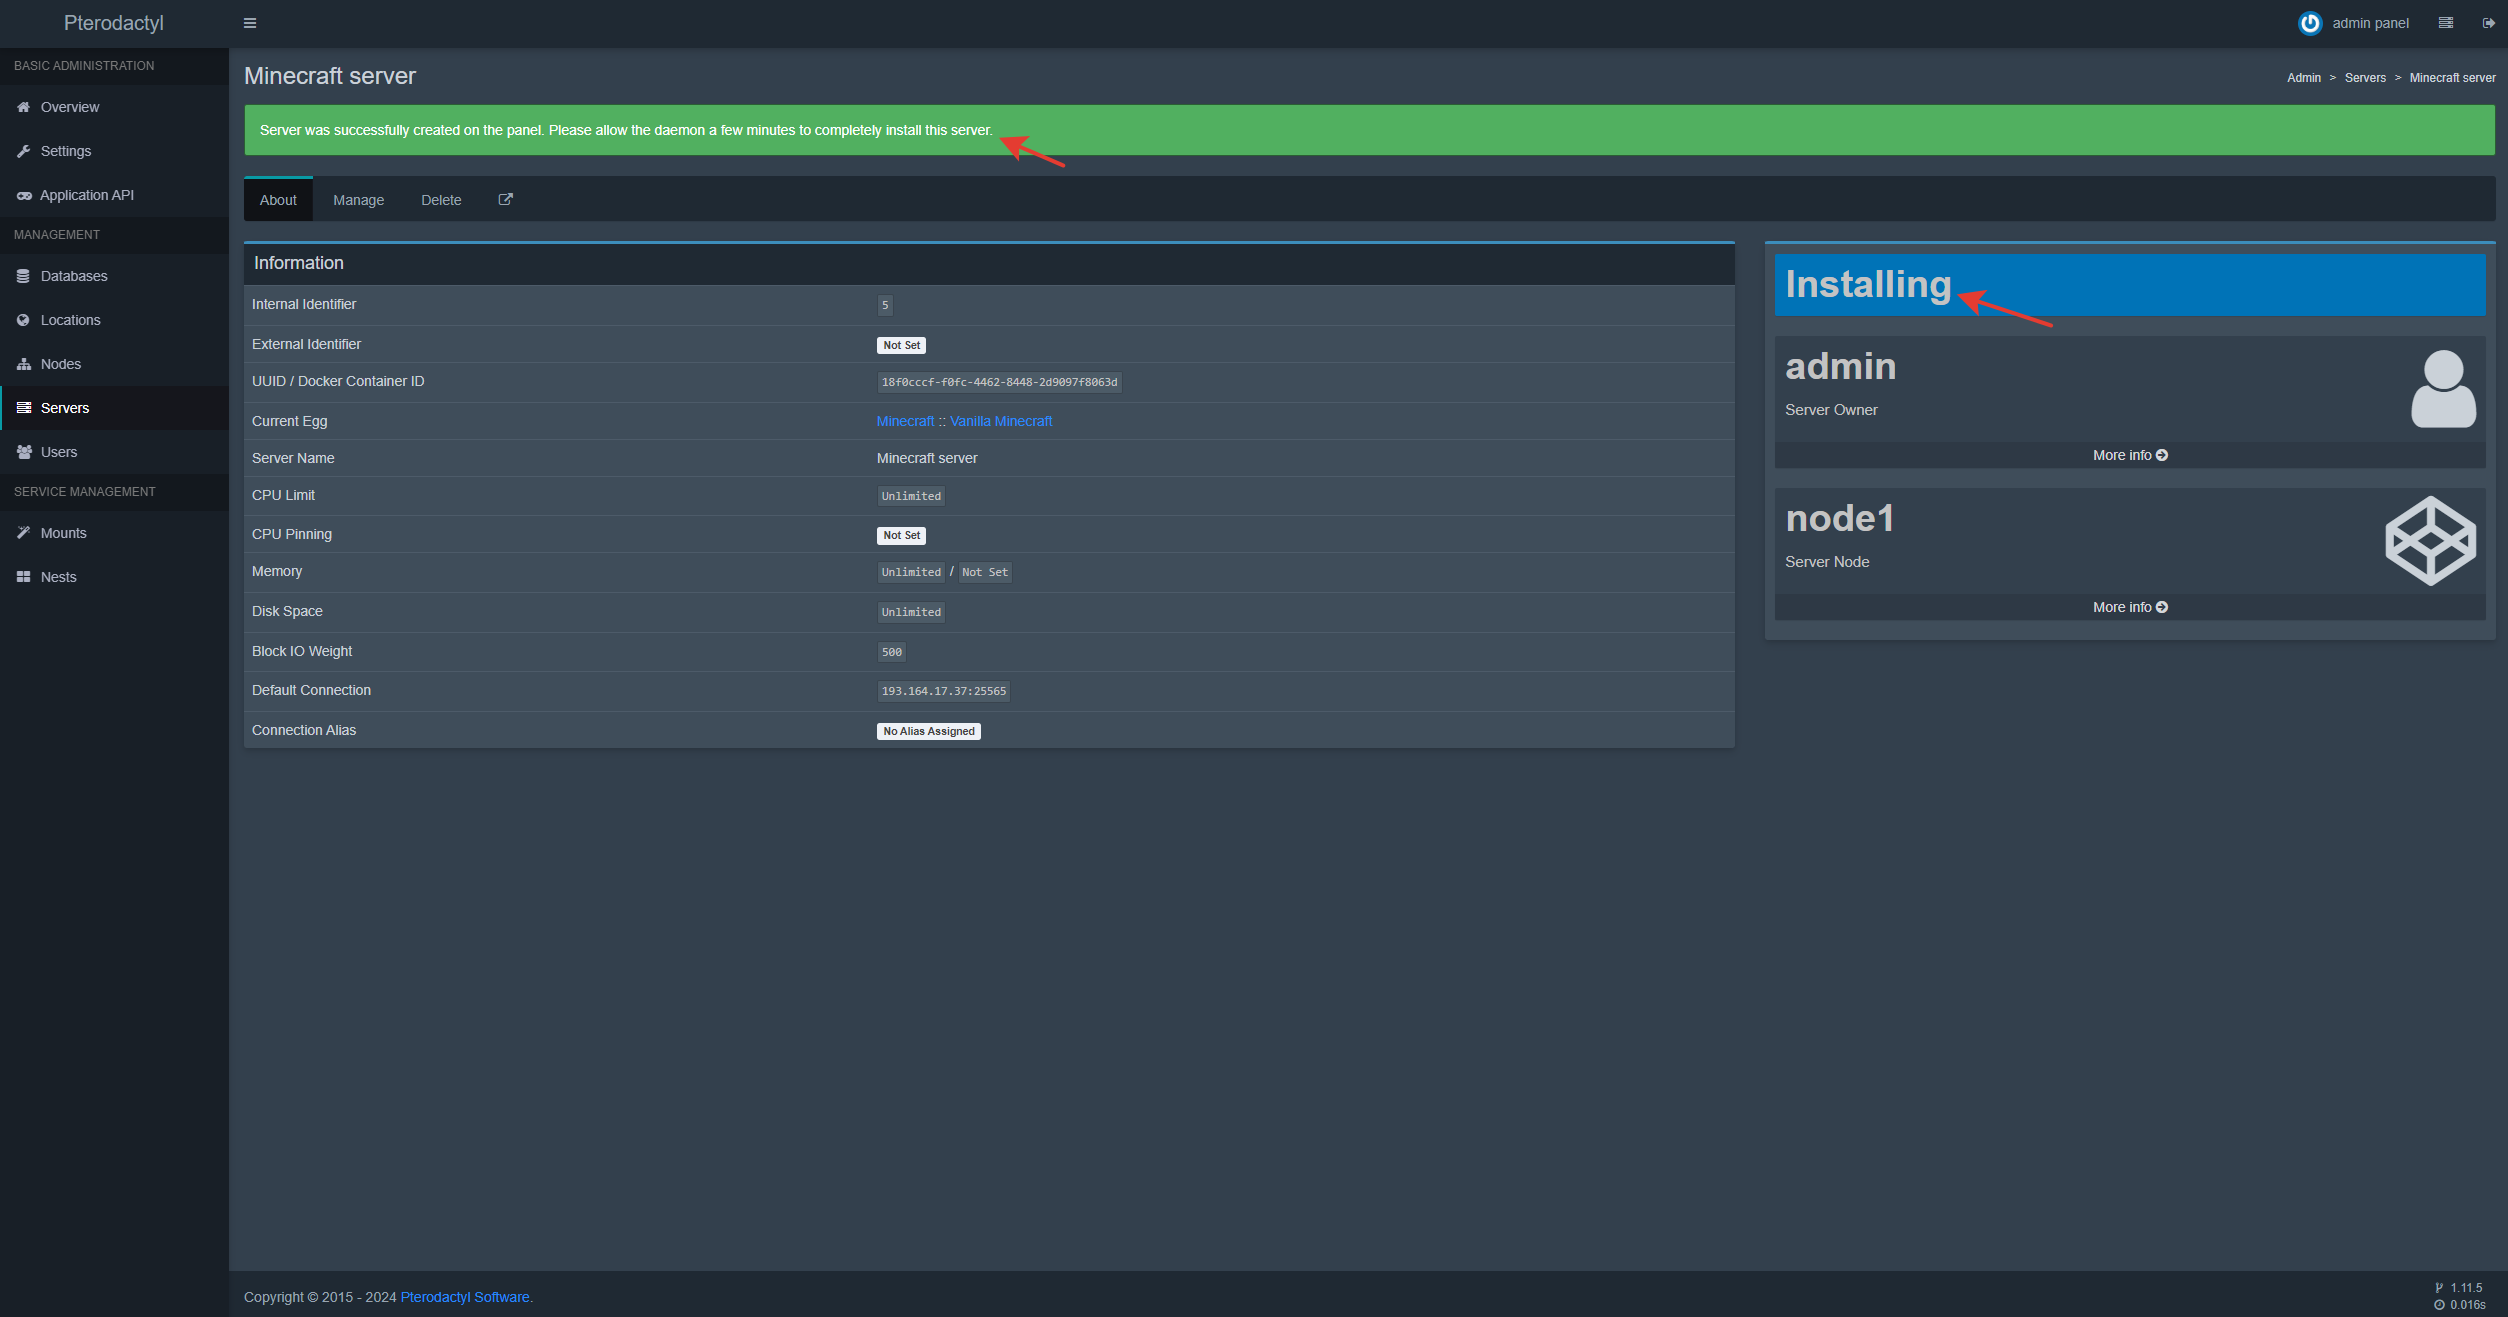
Wait until the installation of the game server is completed, after which it will be displayed in the list of servers with the status Active.
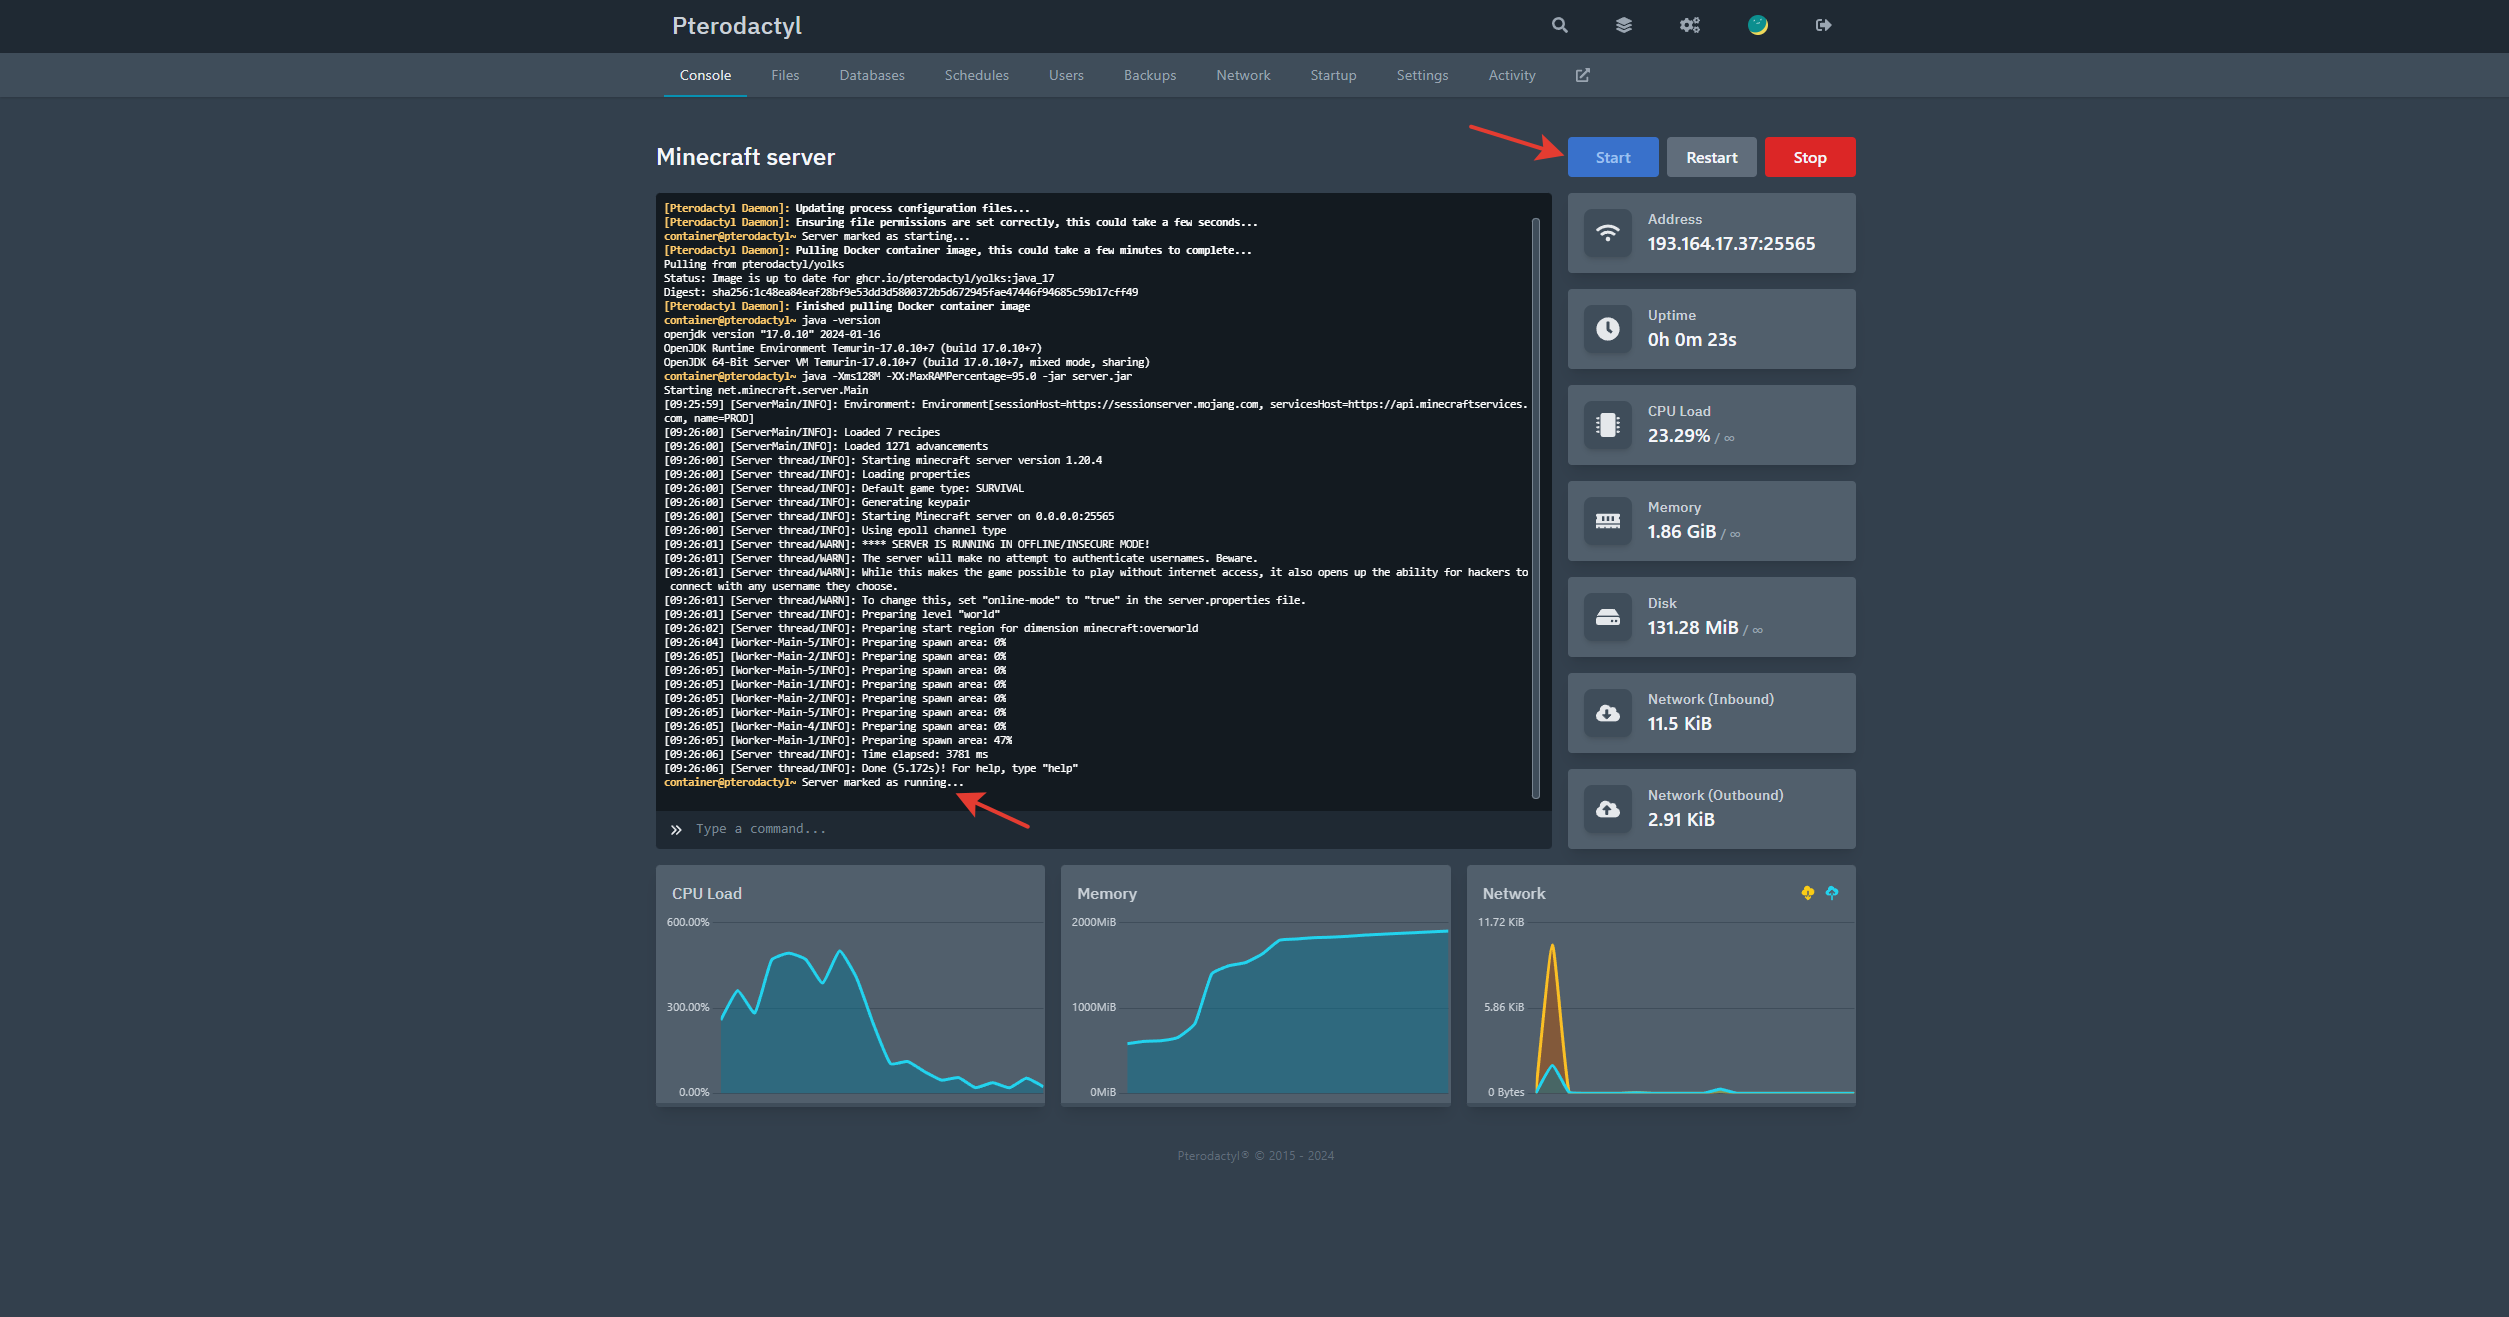
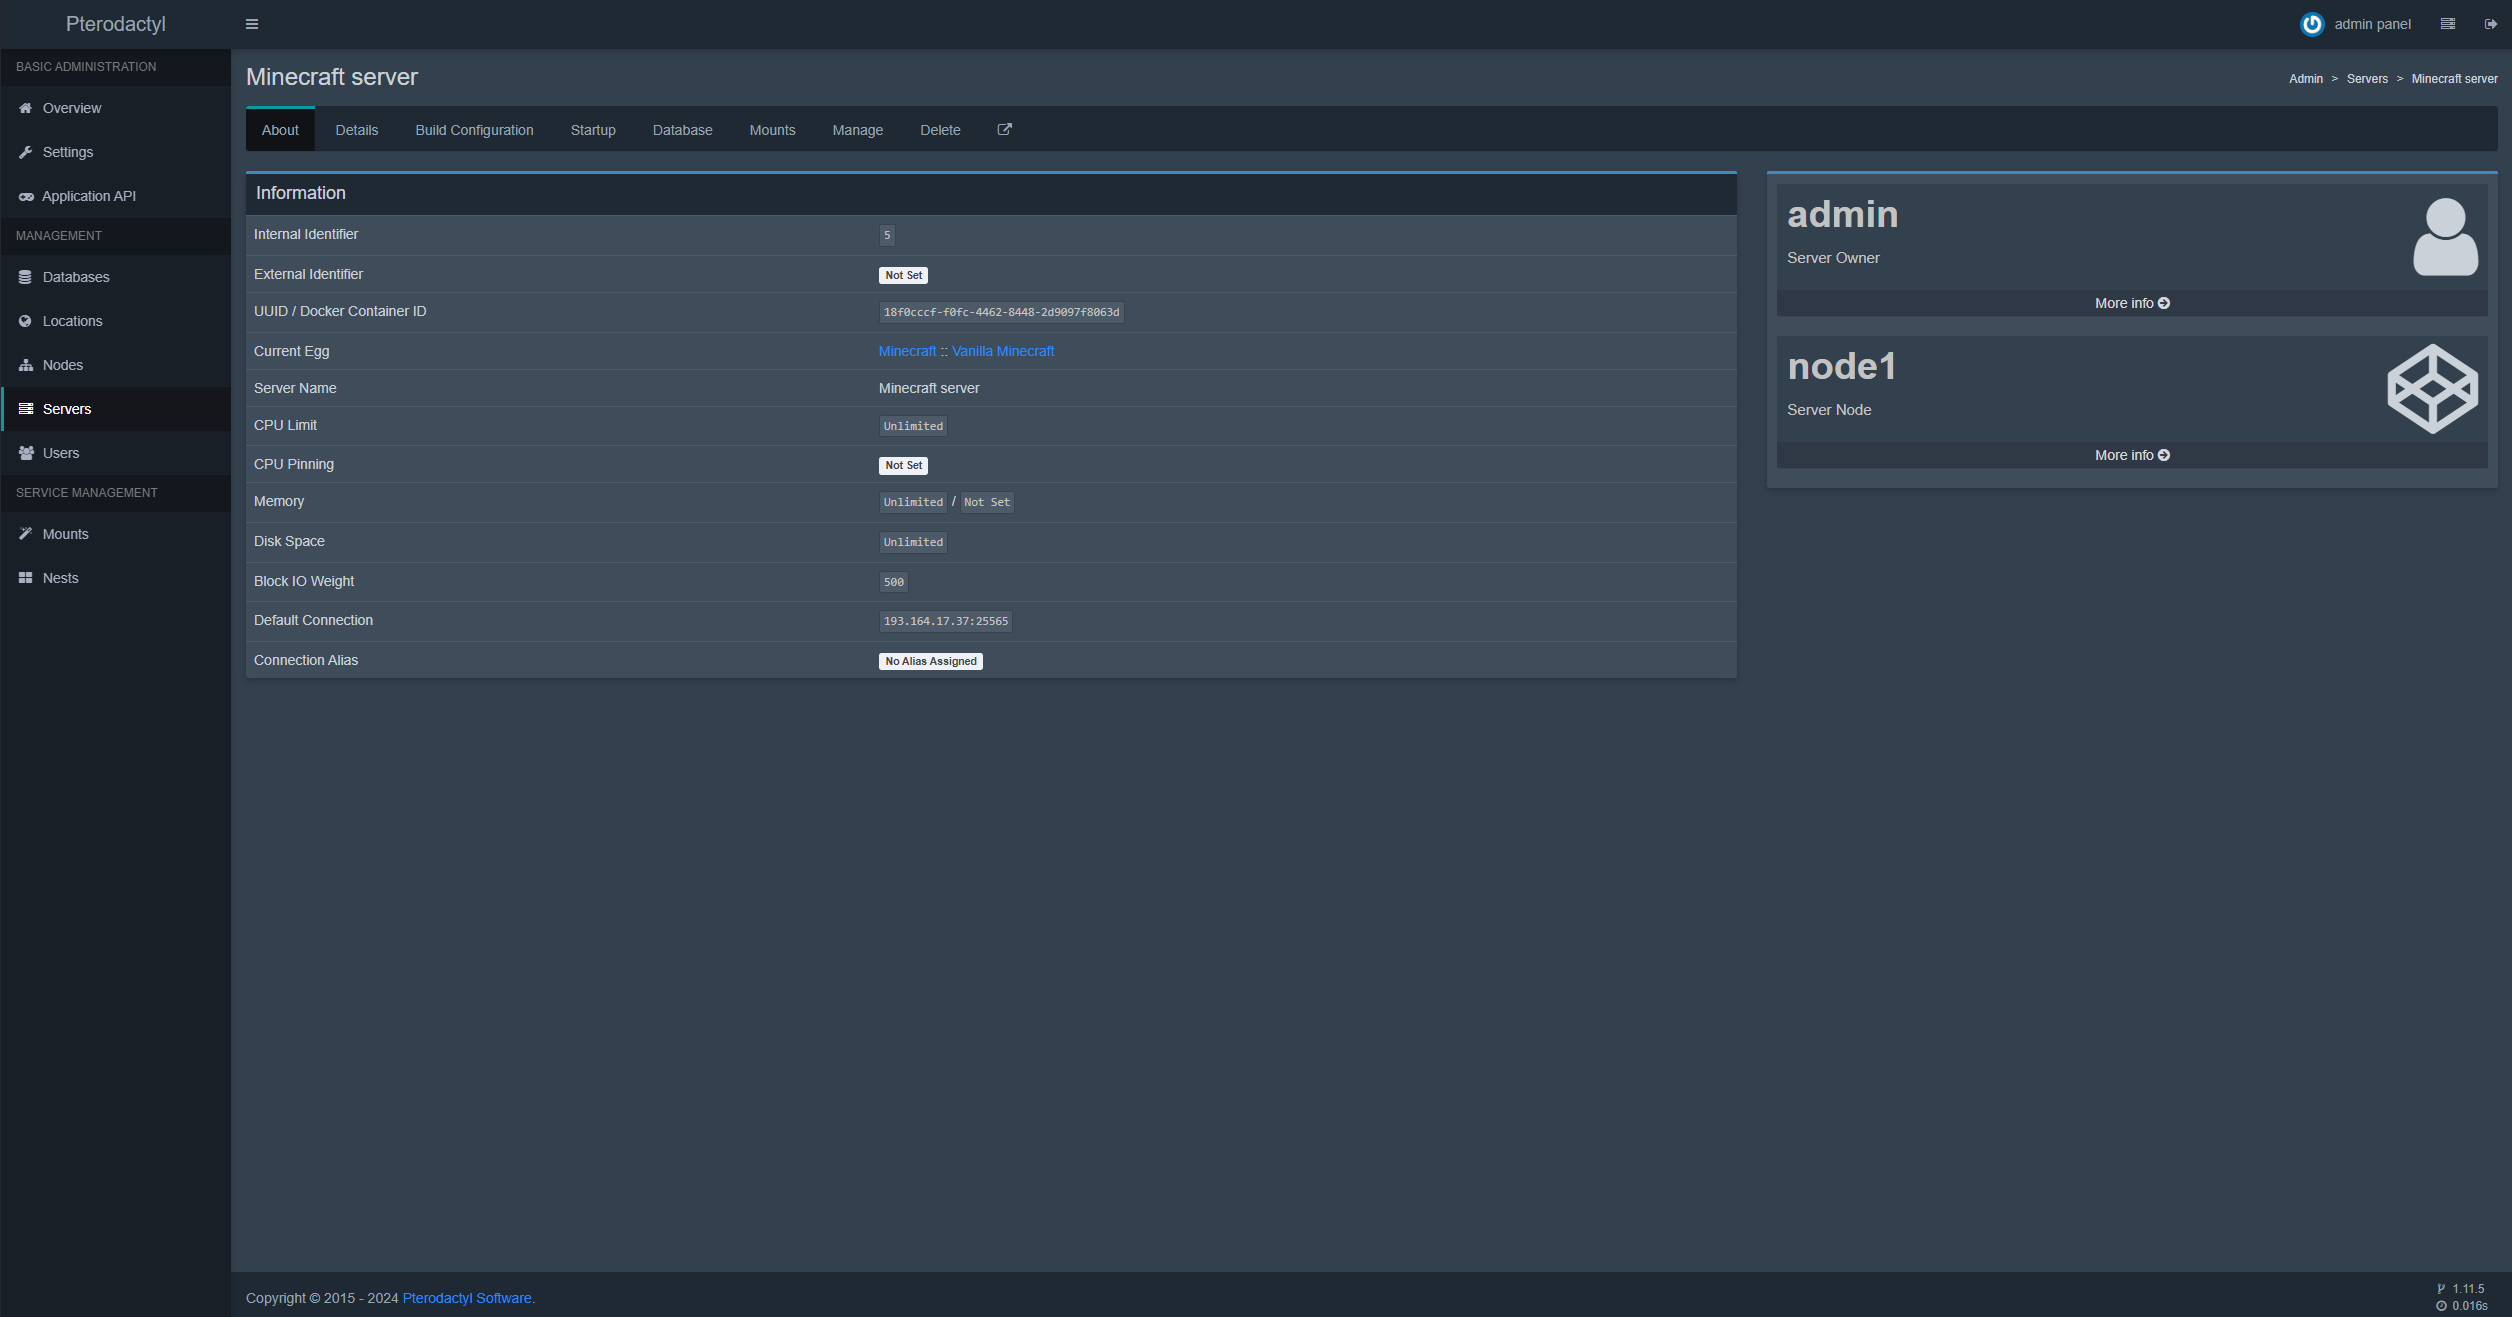
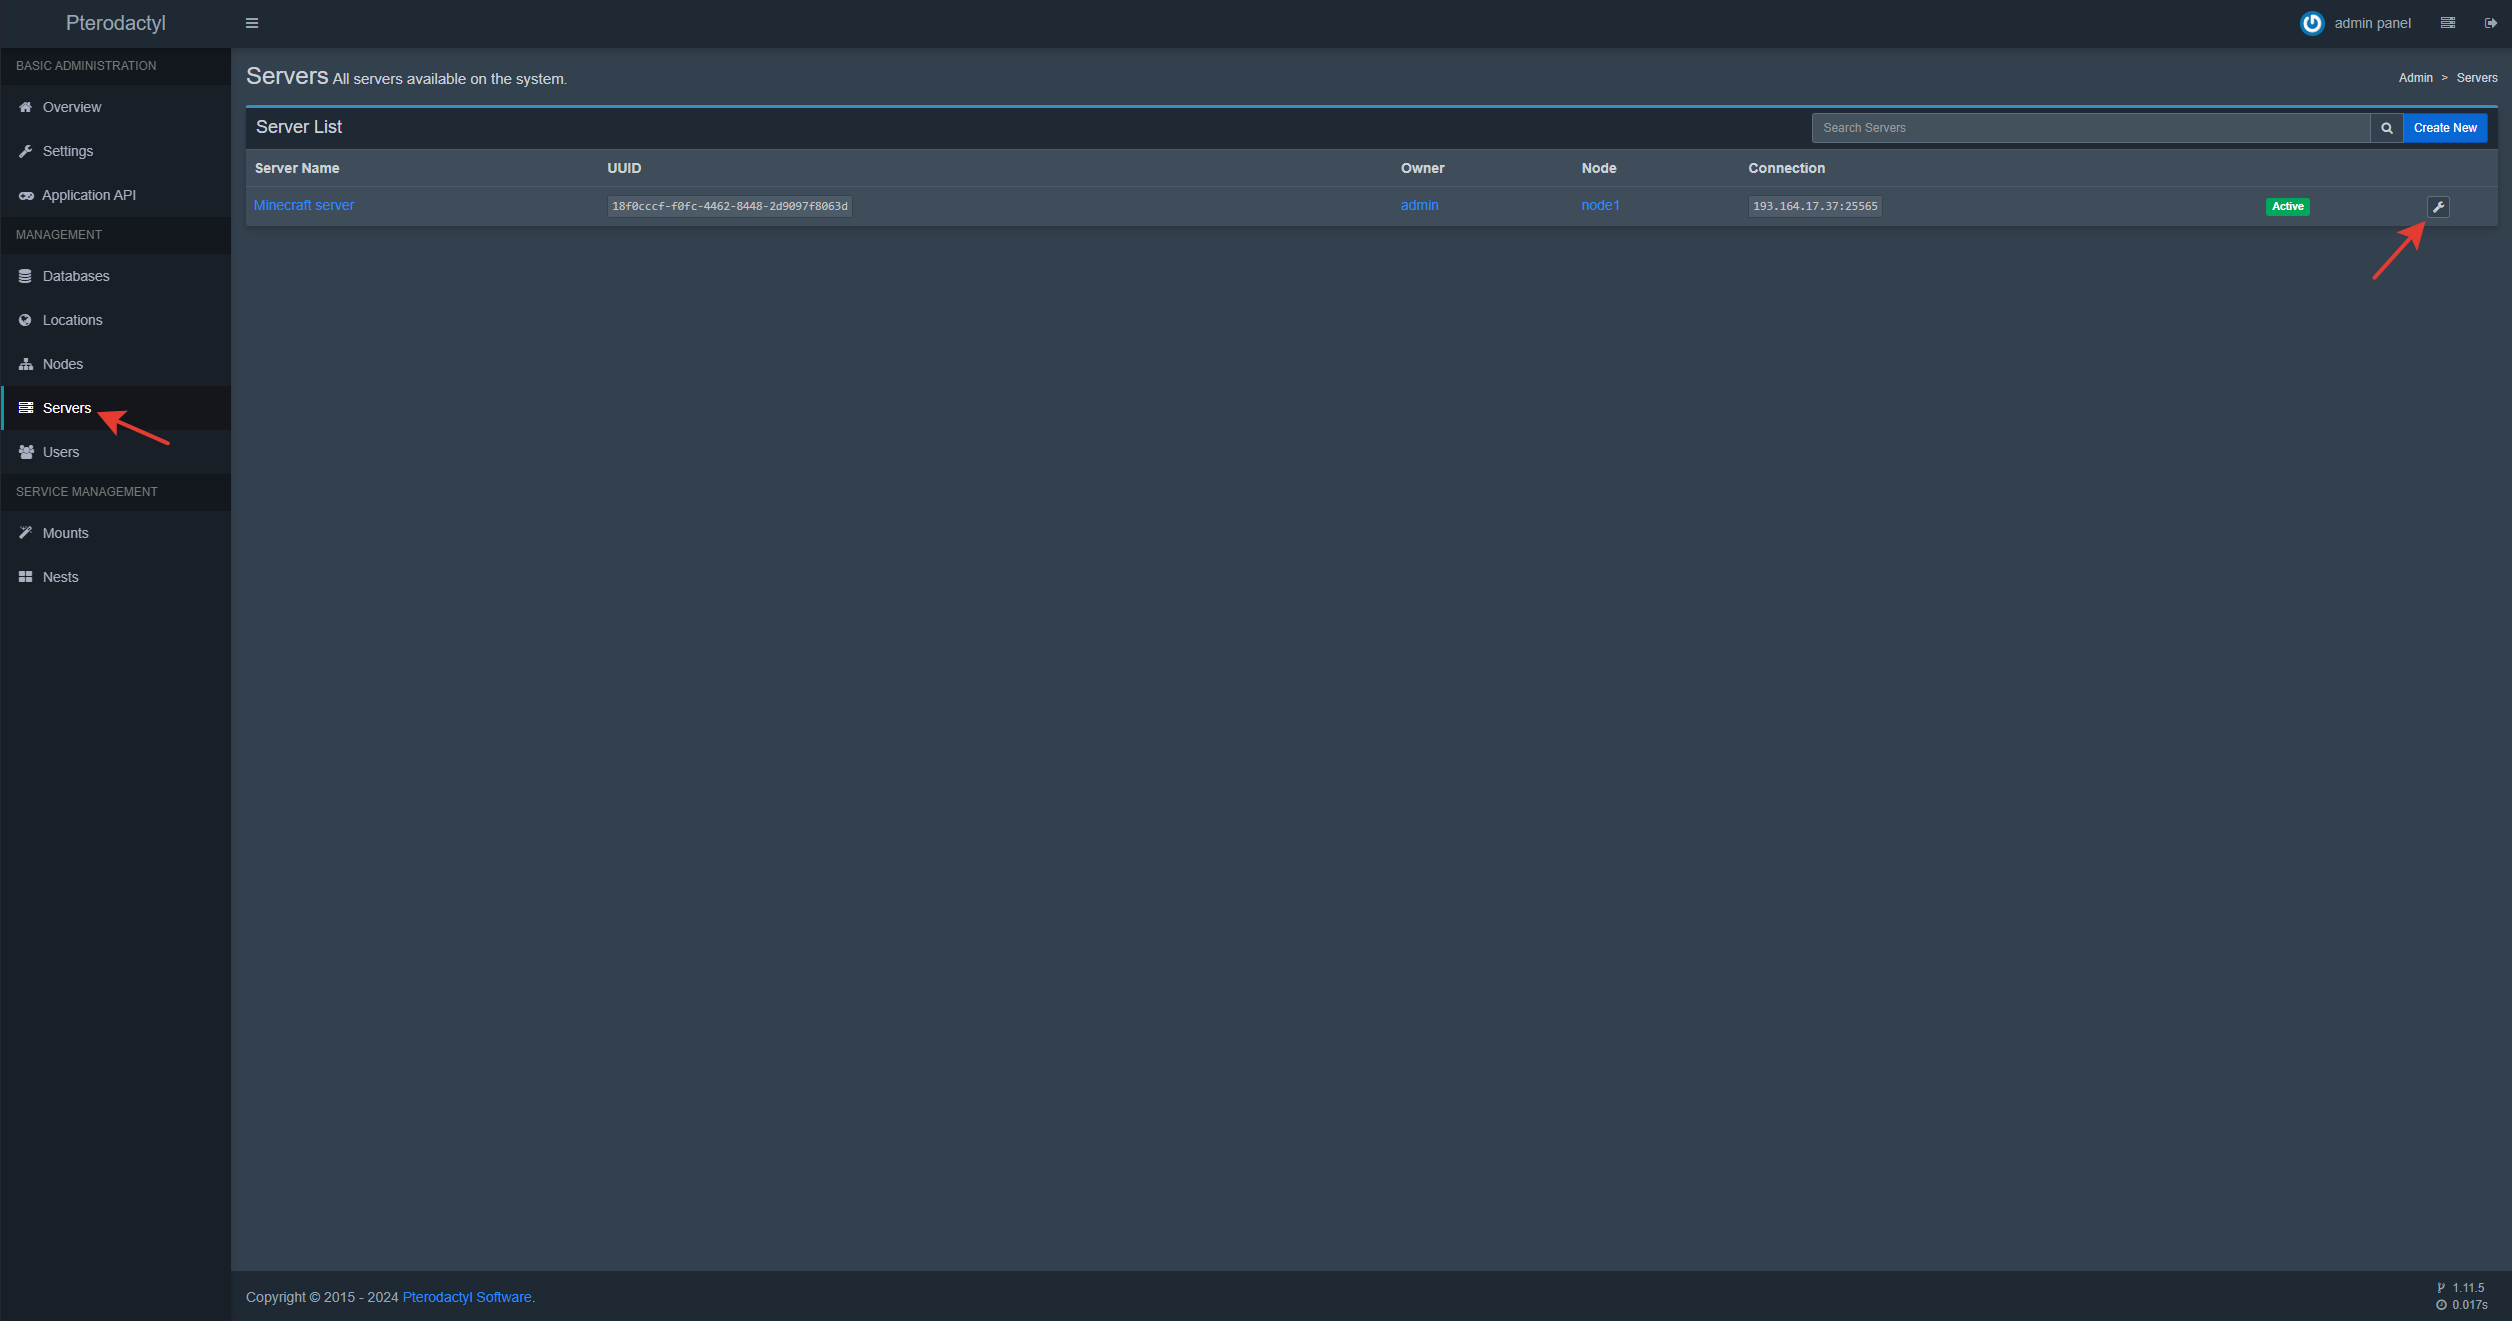
When you click on the name of the created server, its menu will open, with options for setting up and configuring the server. To start the server, you need to click on the button in the form of a key.
The game server is started by pressing the Start button, you need to wait until the loading is completed (the message "Server marked as running" will appear in the server window) and after that you can connect to the server through the game client on Your computer. This completes the installation and basic configuration of the Pterodactyl game server control panel. You can create game servers and manage them in the panel interface.